DIY Geodome Greenhouse for Small Urban Gardens
Each winter I plan out what I want to grow, purchase the needed seed supplies and as spring breaks through the snow, I start to grow.
And every year I do not have enough space for all the seedlings I start. After facing the struggle year after year I began to research seasonal extenders like greenhouses, mocked up my own growing structure with a budget of $0, and after enough research, trial and success decided it was time to invest.

Magidome Connector Giveaway is live!
Contest closes June 20, 2021 at 11:59pm EST.
For details on how to enter check out the video below.
Cost, ease of building, and flexibility were the leading factors for me settling on a geodome. I rent, so the structure could not be permanent, but I do not want to take it down and put it up again every season. It had to stand up to strong winds and storms, and couldn’t take over my small urban garden. I also wanted it to serve multiple purposes for the real estate that it would be claiming.
Why Pick a Geodome Greenhouse?
I weighed out various options against my criteria before picking a geodome greenhouse for my small urban garden in Toronto.
Geodomes visually, are really cool! If this structure was going to take up a significant part of my yard, I wanted to enjoy looking at it. RV garages or hoop style greenhouse structures weren’t what I was hoping to stare at.
From a science perspective their shape handles loads and forces better then most other structures. They handle and deflect wind loads and snow better then traditional building shapes. The multiple faces capture the suns light better then rectangular structures, especially when you do not have the flexibility to align to the suns axis. In a small urban garden, I did not have the luxury of aligning to the sun. Plus they offer the greatest volume with the least surface area of traditional structures.
Geodomes are often ‘modular’. Their size can scale up or down easily. This meant I wasn’t limited to standard 5’ x 8’ structures and could play with the amount of real estate it would hold.
The walls and roof are all the same. No determining pitch and slope, or bracing walls to put a roof on. A geodome is one angle used repeatedly making construction rather elementary and something I could do as an individual. I did not need a second person to help brace a wall while we squared up the structure.
The downside to geodome greenhouses is that they are often extremely expensive, starting around $4000. Most kits were also significantly larger then what I could commit to. Geodomes were the dream but did not seem realistic for my setting due to the cost.

And then I found geodome connector kits…
Geodome Connector Kit
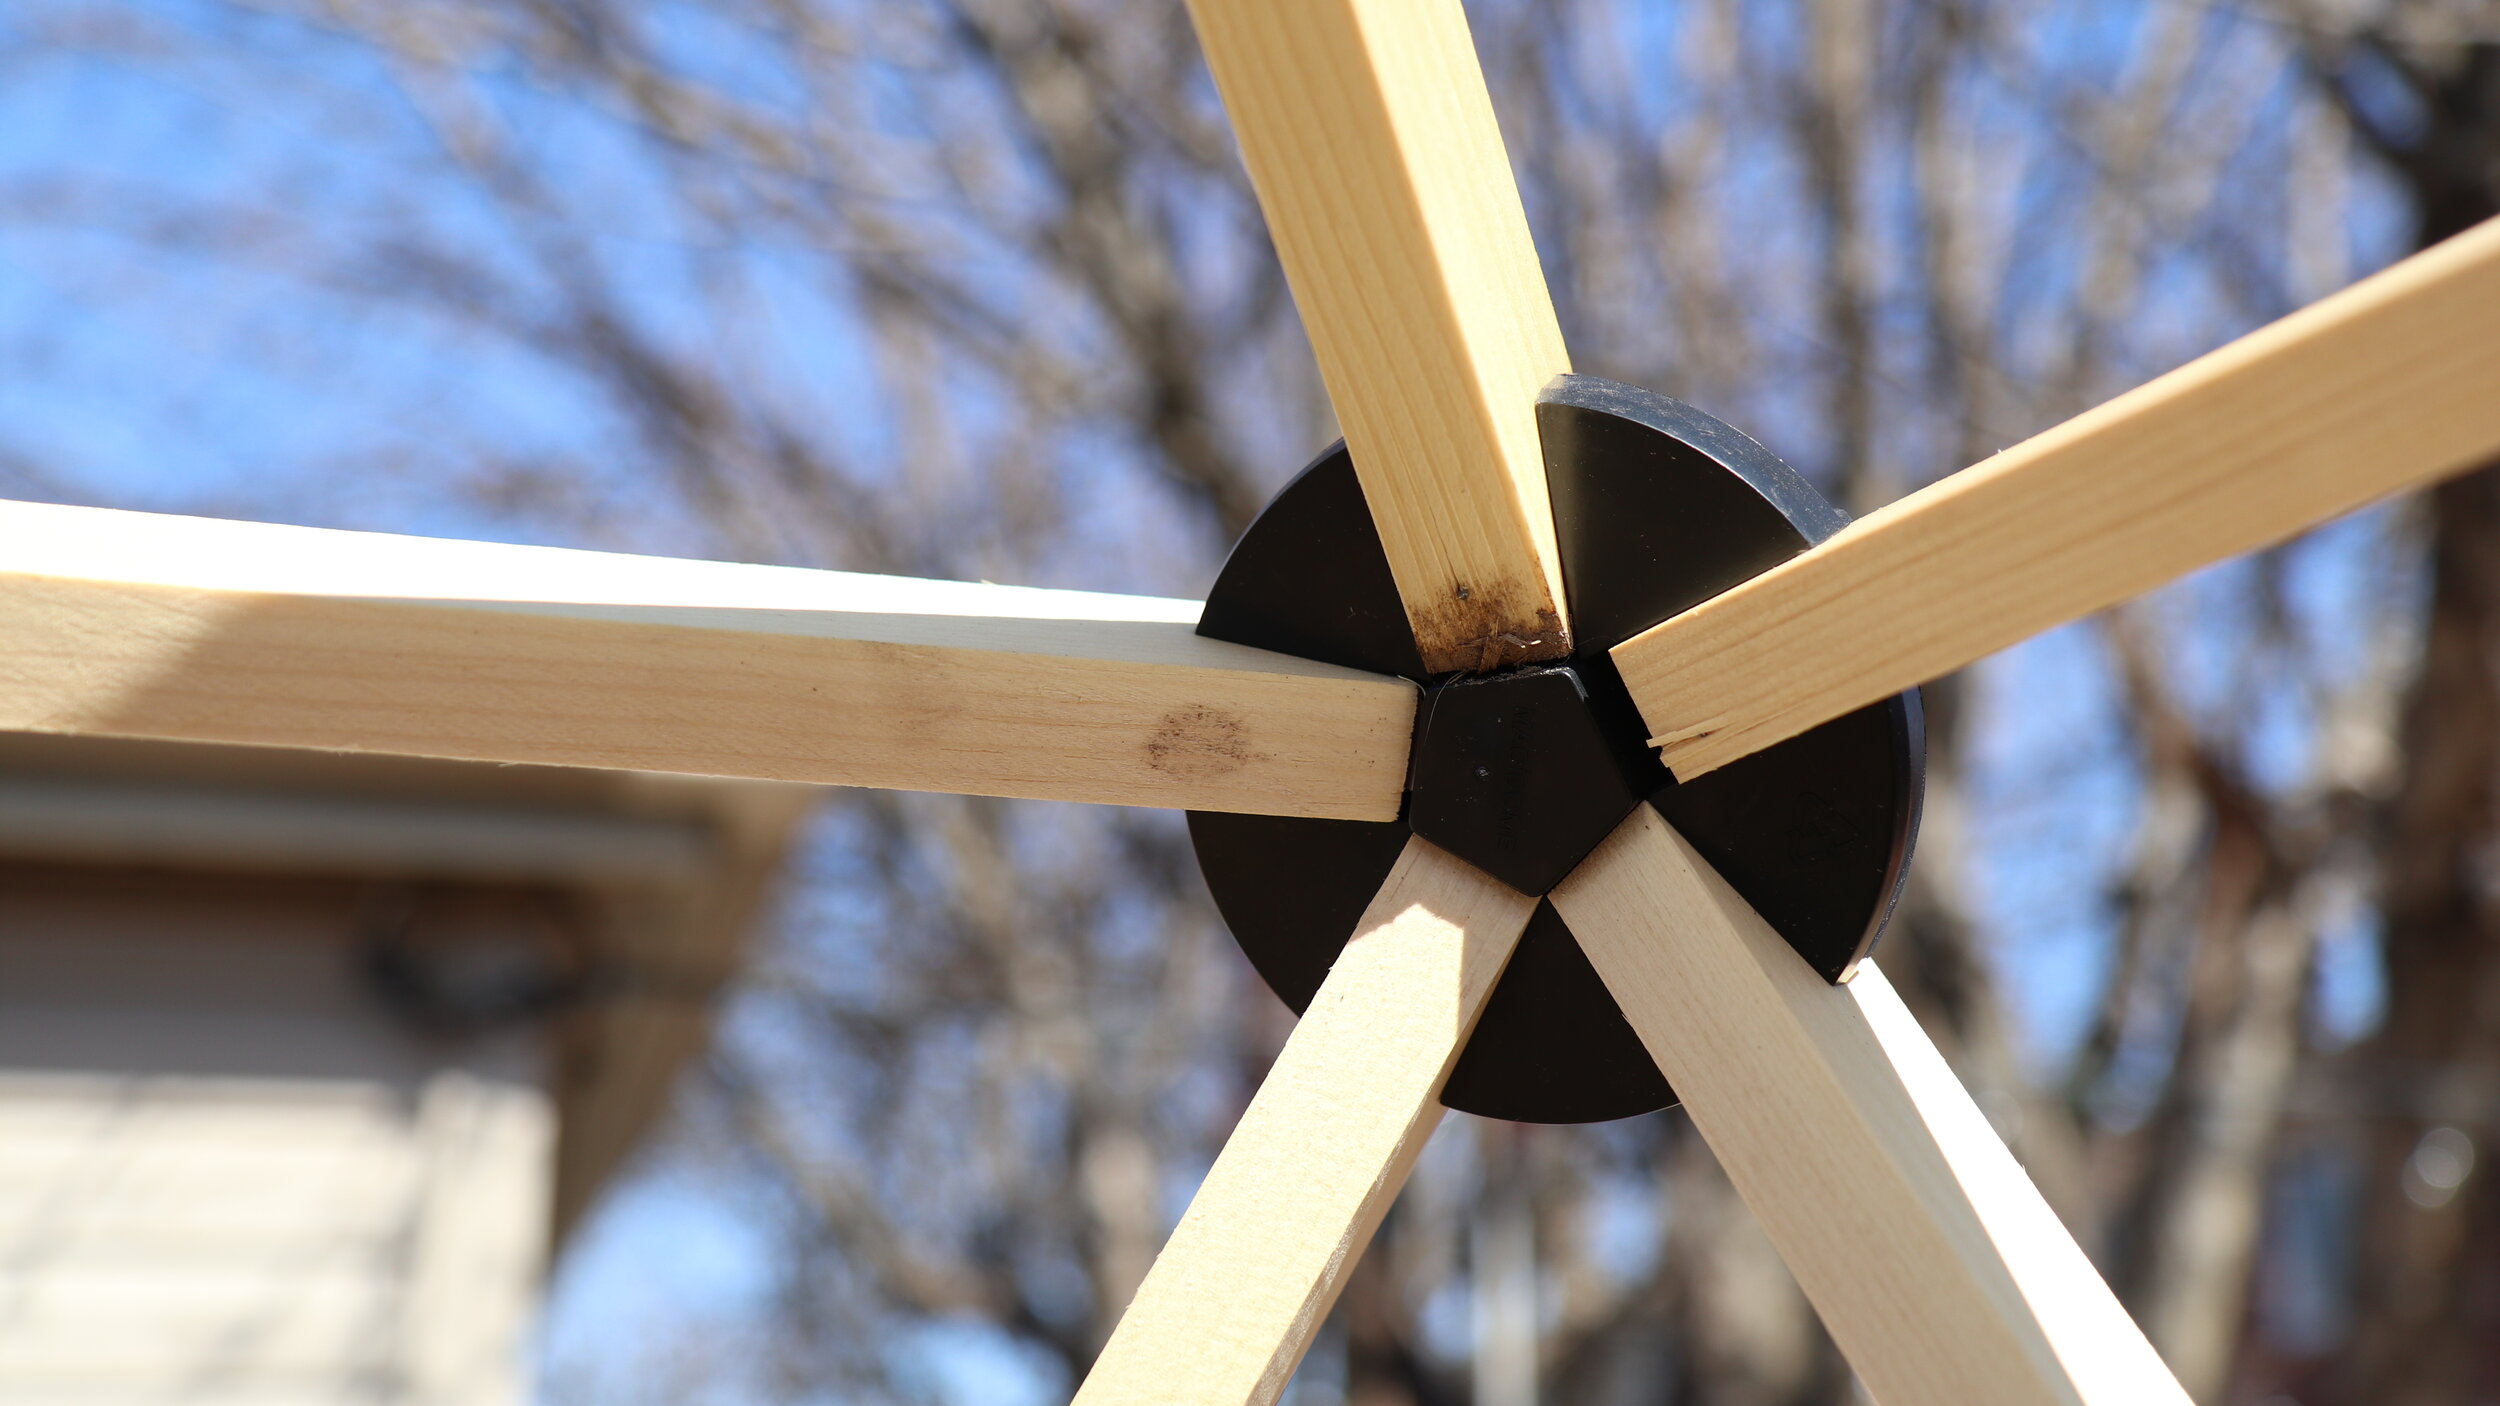
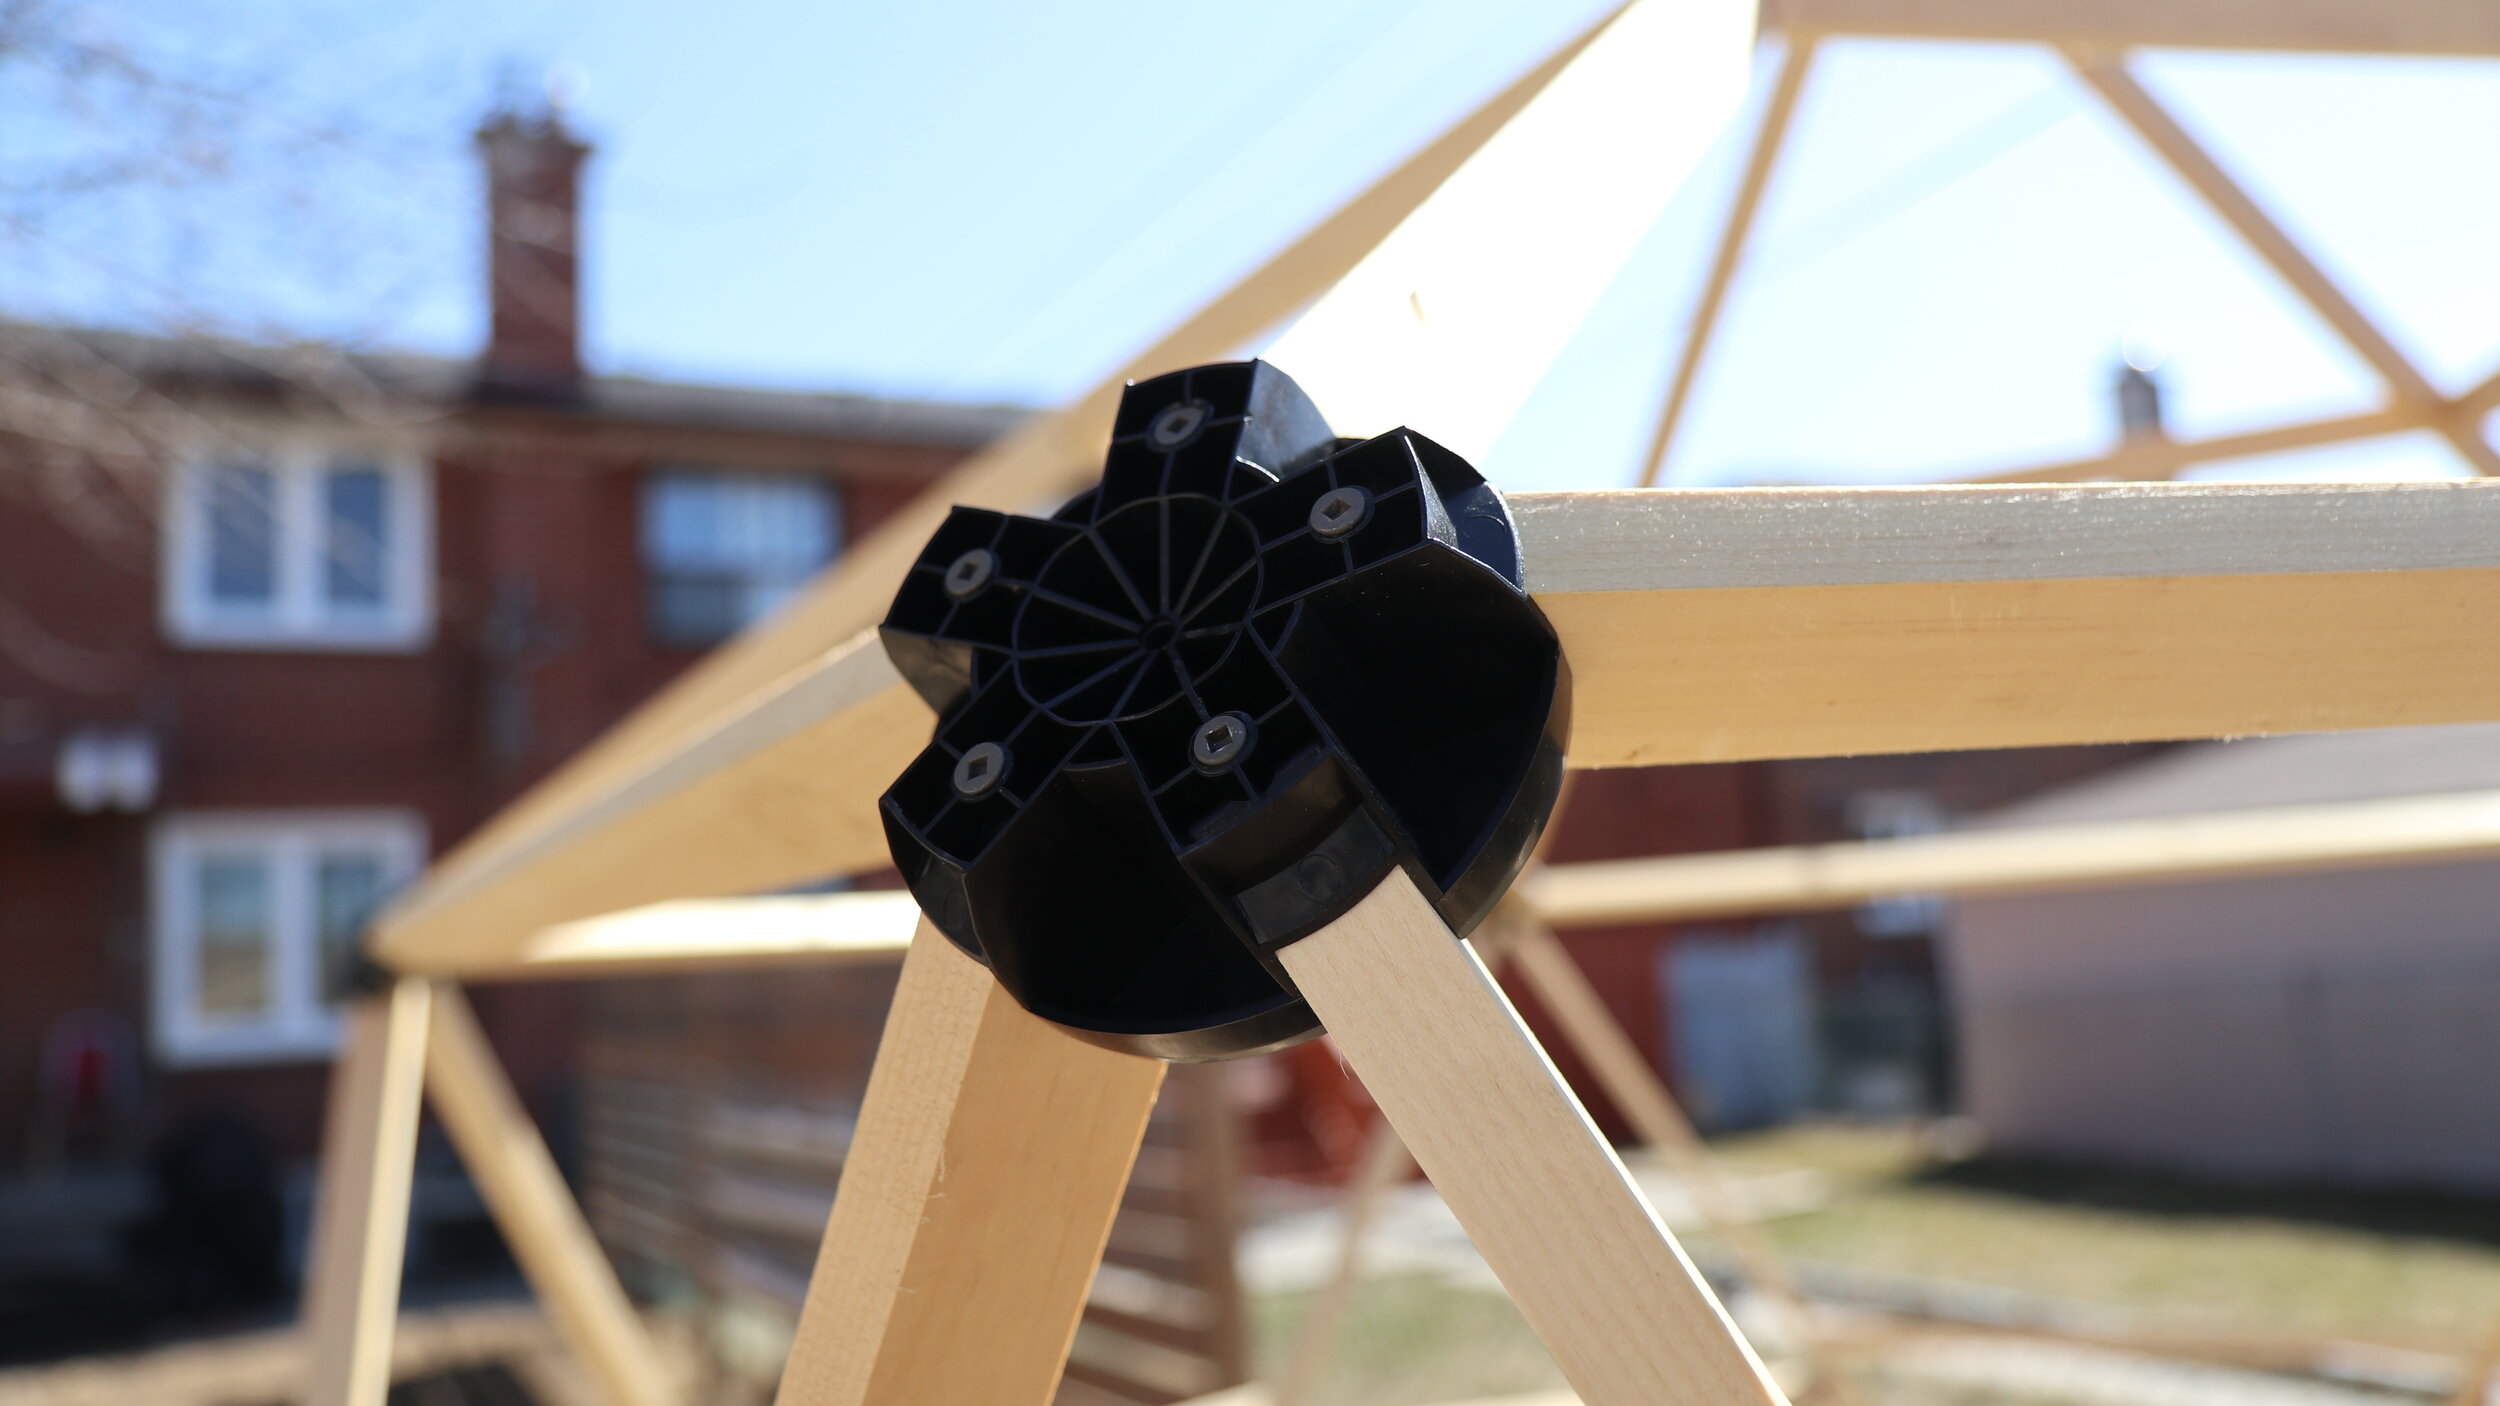
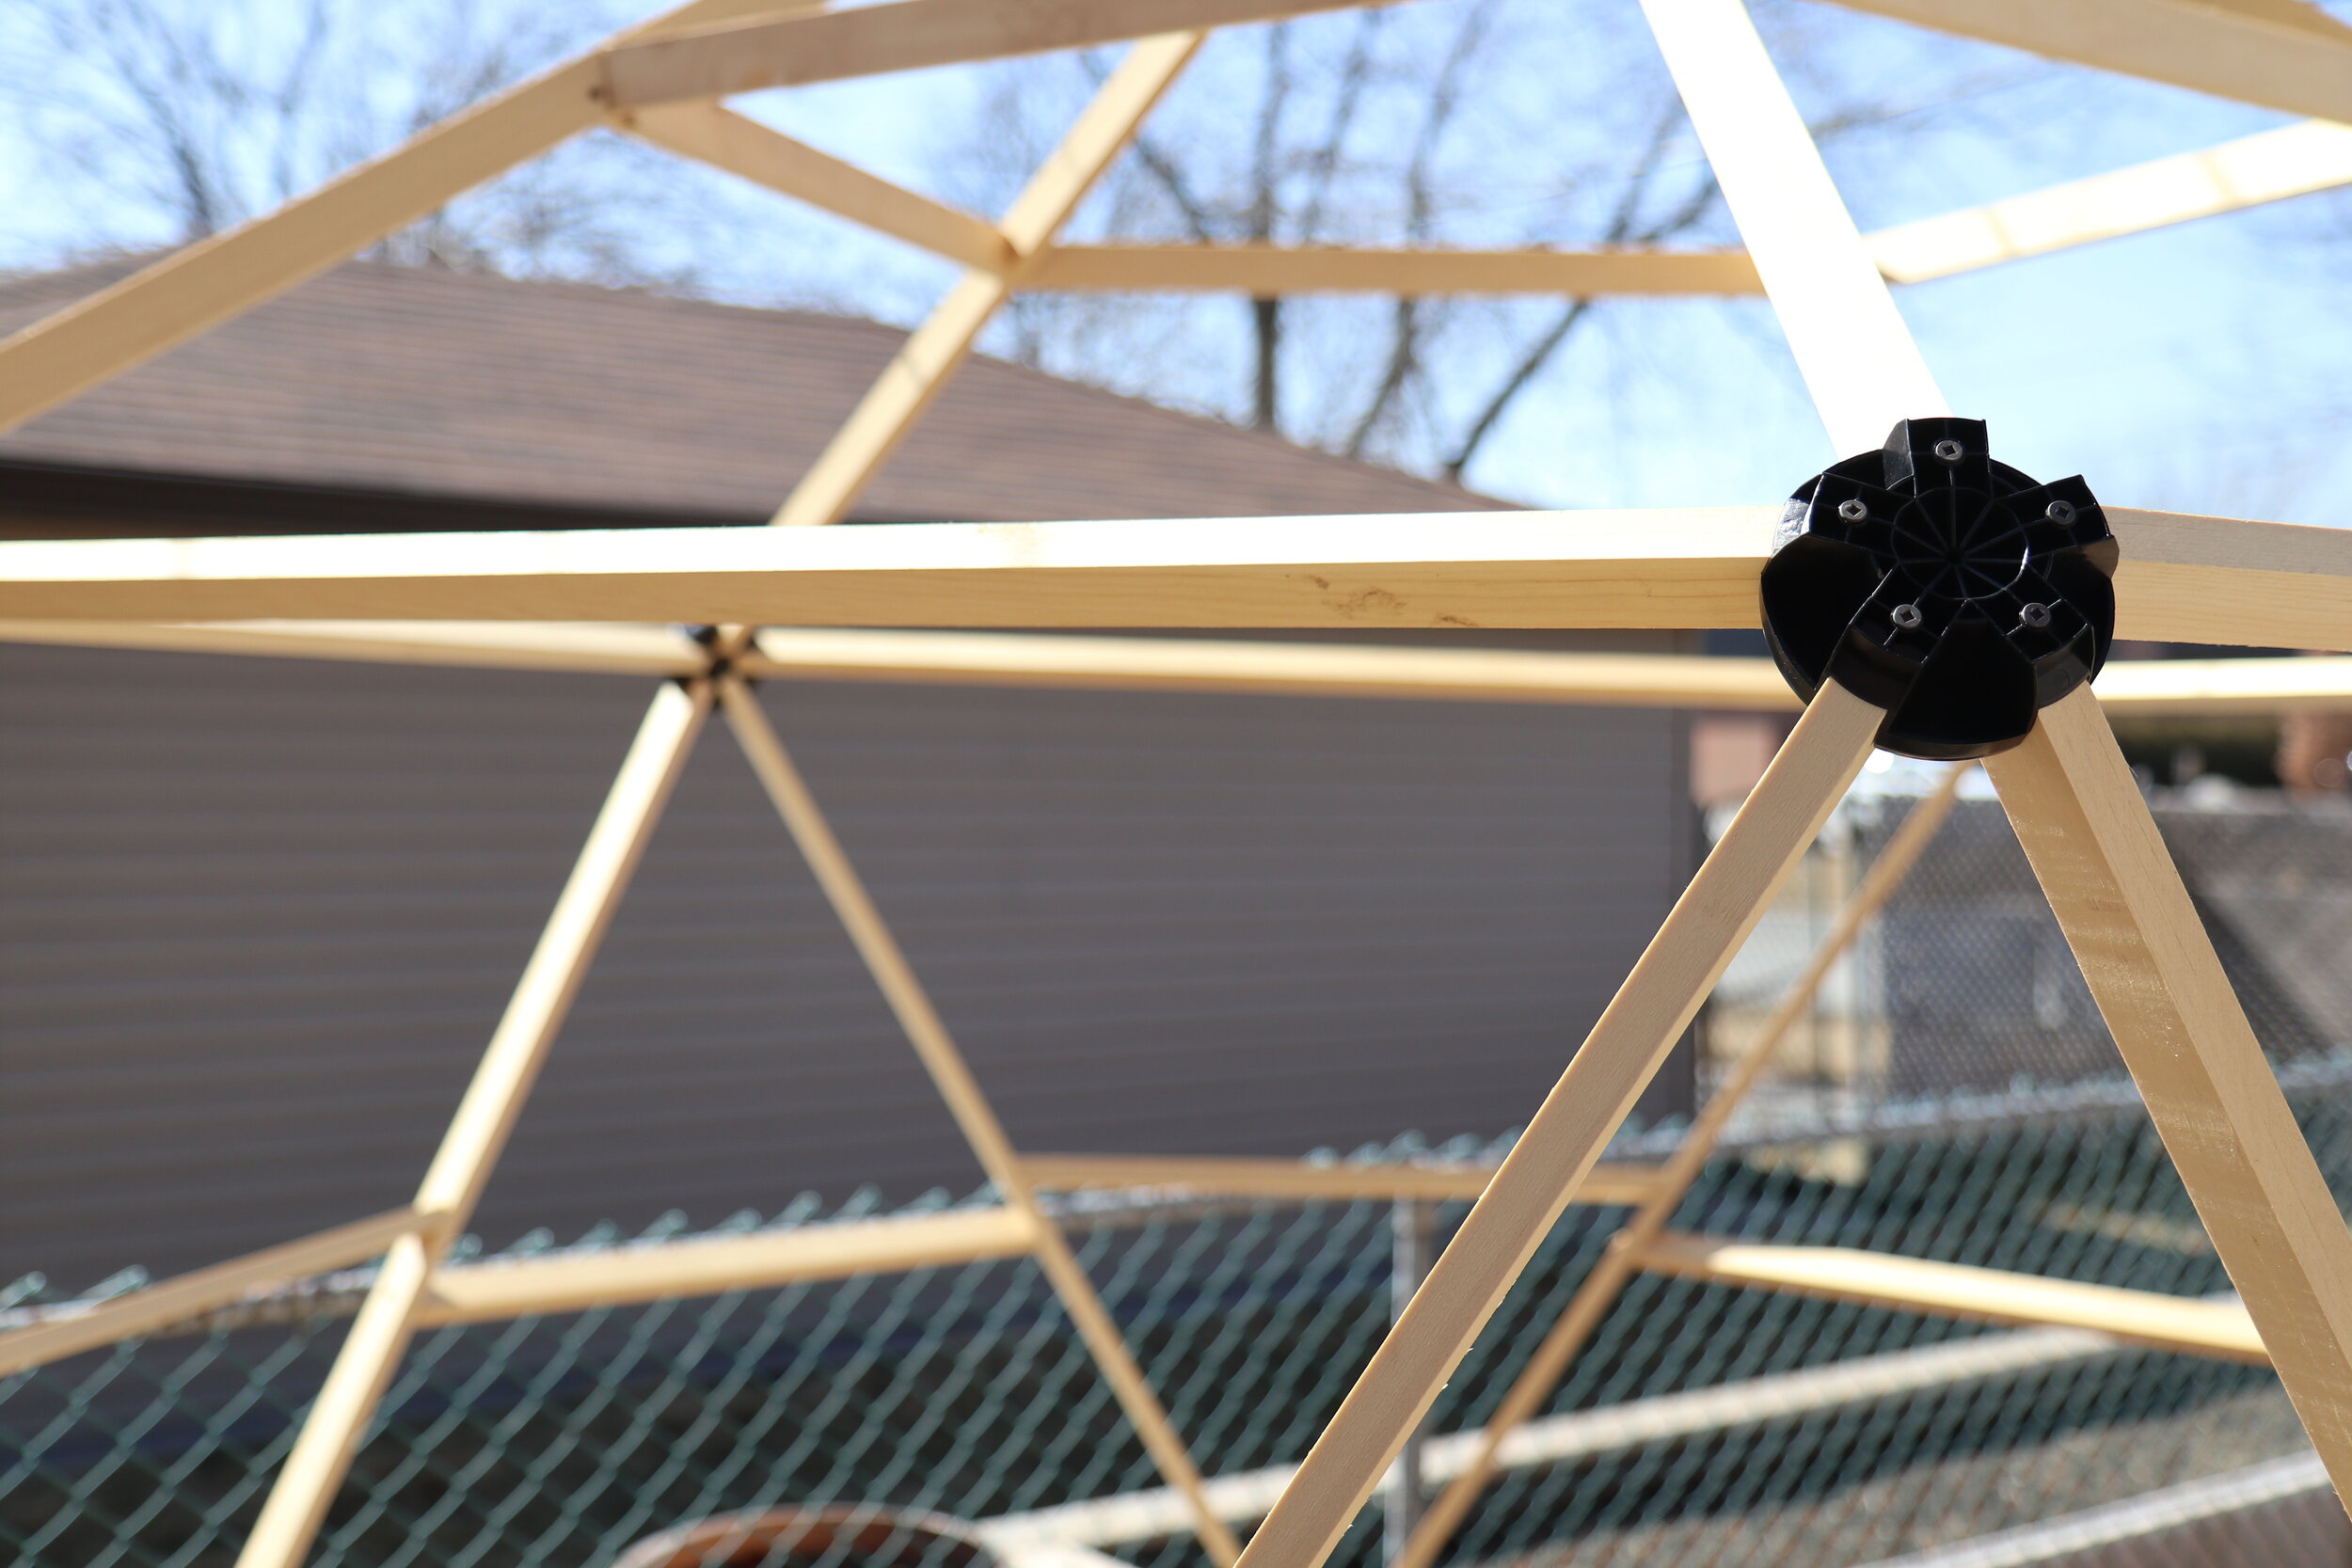
This changed everything. There are a lot of angled cuts that typically go into geodomes but I used a connector kit from Magidome that took all the math out and made construction incredibly quick and simple. The size was modular. It can be disassembled in the future and relocated but can also withstand year round use.
The magidome connectors are black plastic, with the angles and holes for drilling all preset. The kit recommends predrilling through the kit, into the wood and then using a machine screw. We tried this, but found that regular deck screws gripped the wood much better. The other screws pulled out of the wood and our structure kept falling apart as we assembled it. Once we switched to deck screws with predrilling, assembly flew along.
Having to make only simple cuts, through fairly small pieces of lumber, meant that minimal tools were needed. A hand saw could have easily sufficed. I’m a mom without a lot of time to spend on projects. To keep things efficient I called in extra resources. Lucky for me, my brother is a contractor and has some fancy tools which helped speed the process along.
The one change I would like to see made to this product is a ‘base’ connector having a flat edge. Currently each connector is identical. Those that end up on the bottom edge are round which props the lumber up. This is nifty for keeping it off soil and to extend the life of your lumber if placed directly on the soil. If you are installing it onto pavers or a wood base like we did, it doesn’t make for the most ideal connection.
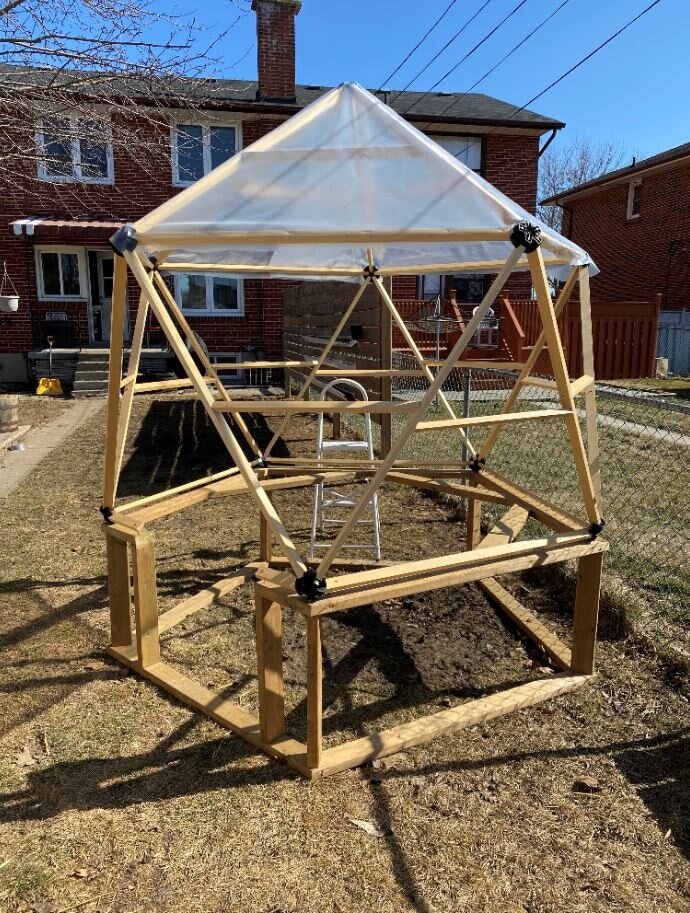
The Magidome 4’ lumber option had the footprint I was after for my small urban garden, but it had one significant problem. I wanted to walk into the structure, not crawl. At 6’, I am a very tall gardener. Scaling to the next size was not an option for my backyard. It would fill the entire width of my space in order to obtain the height I was after.

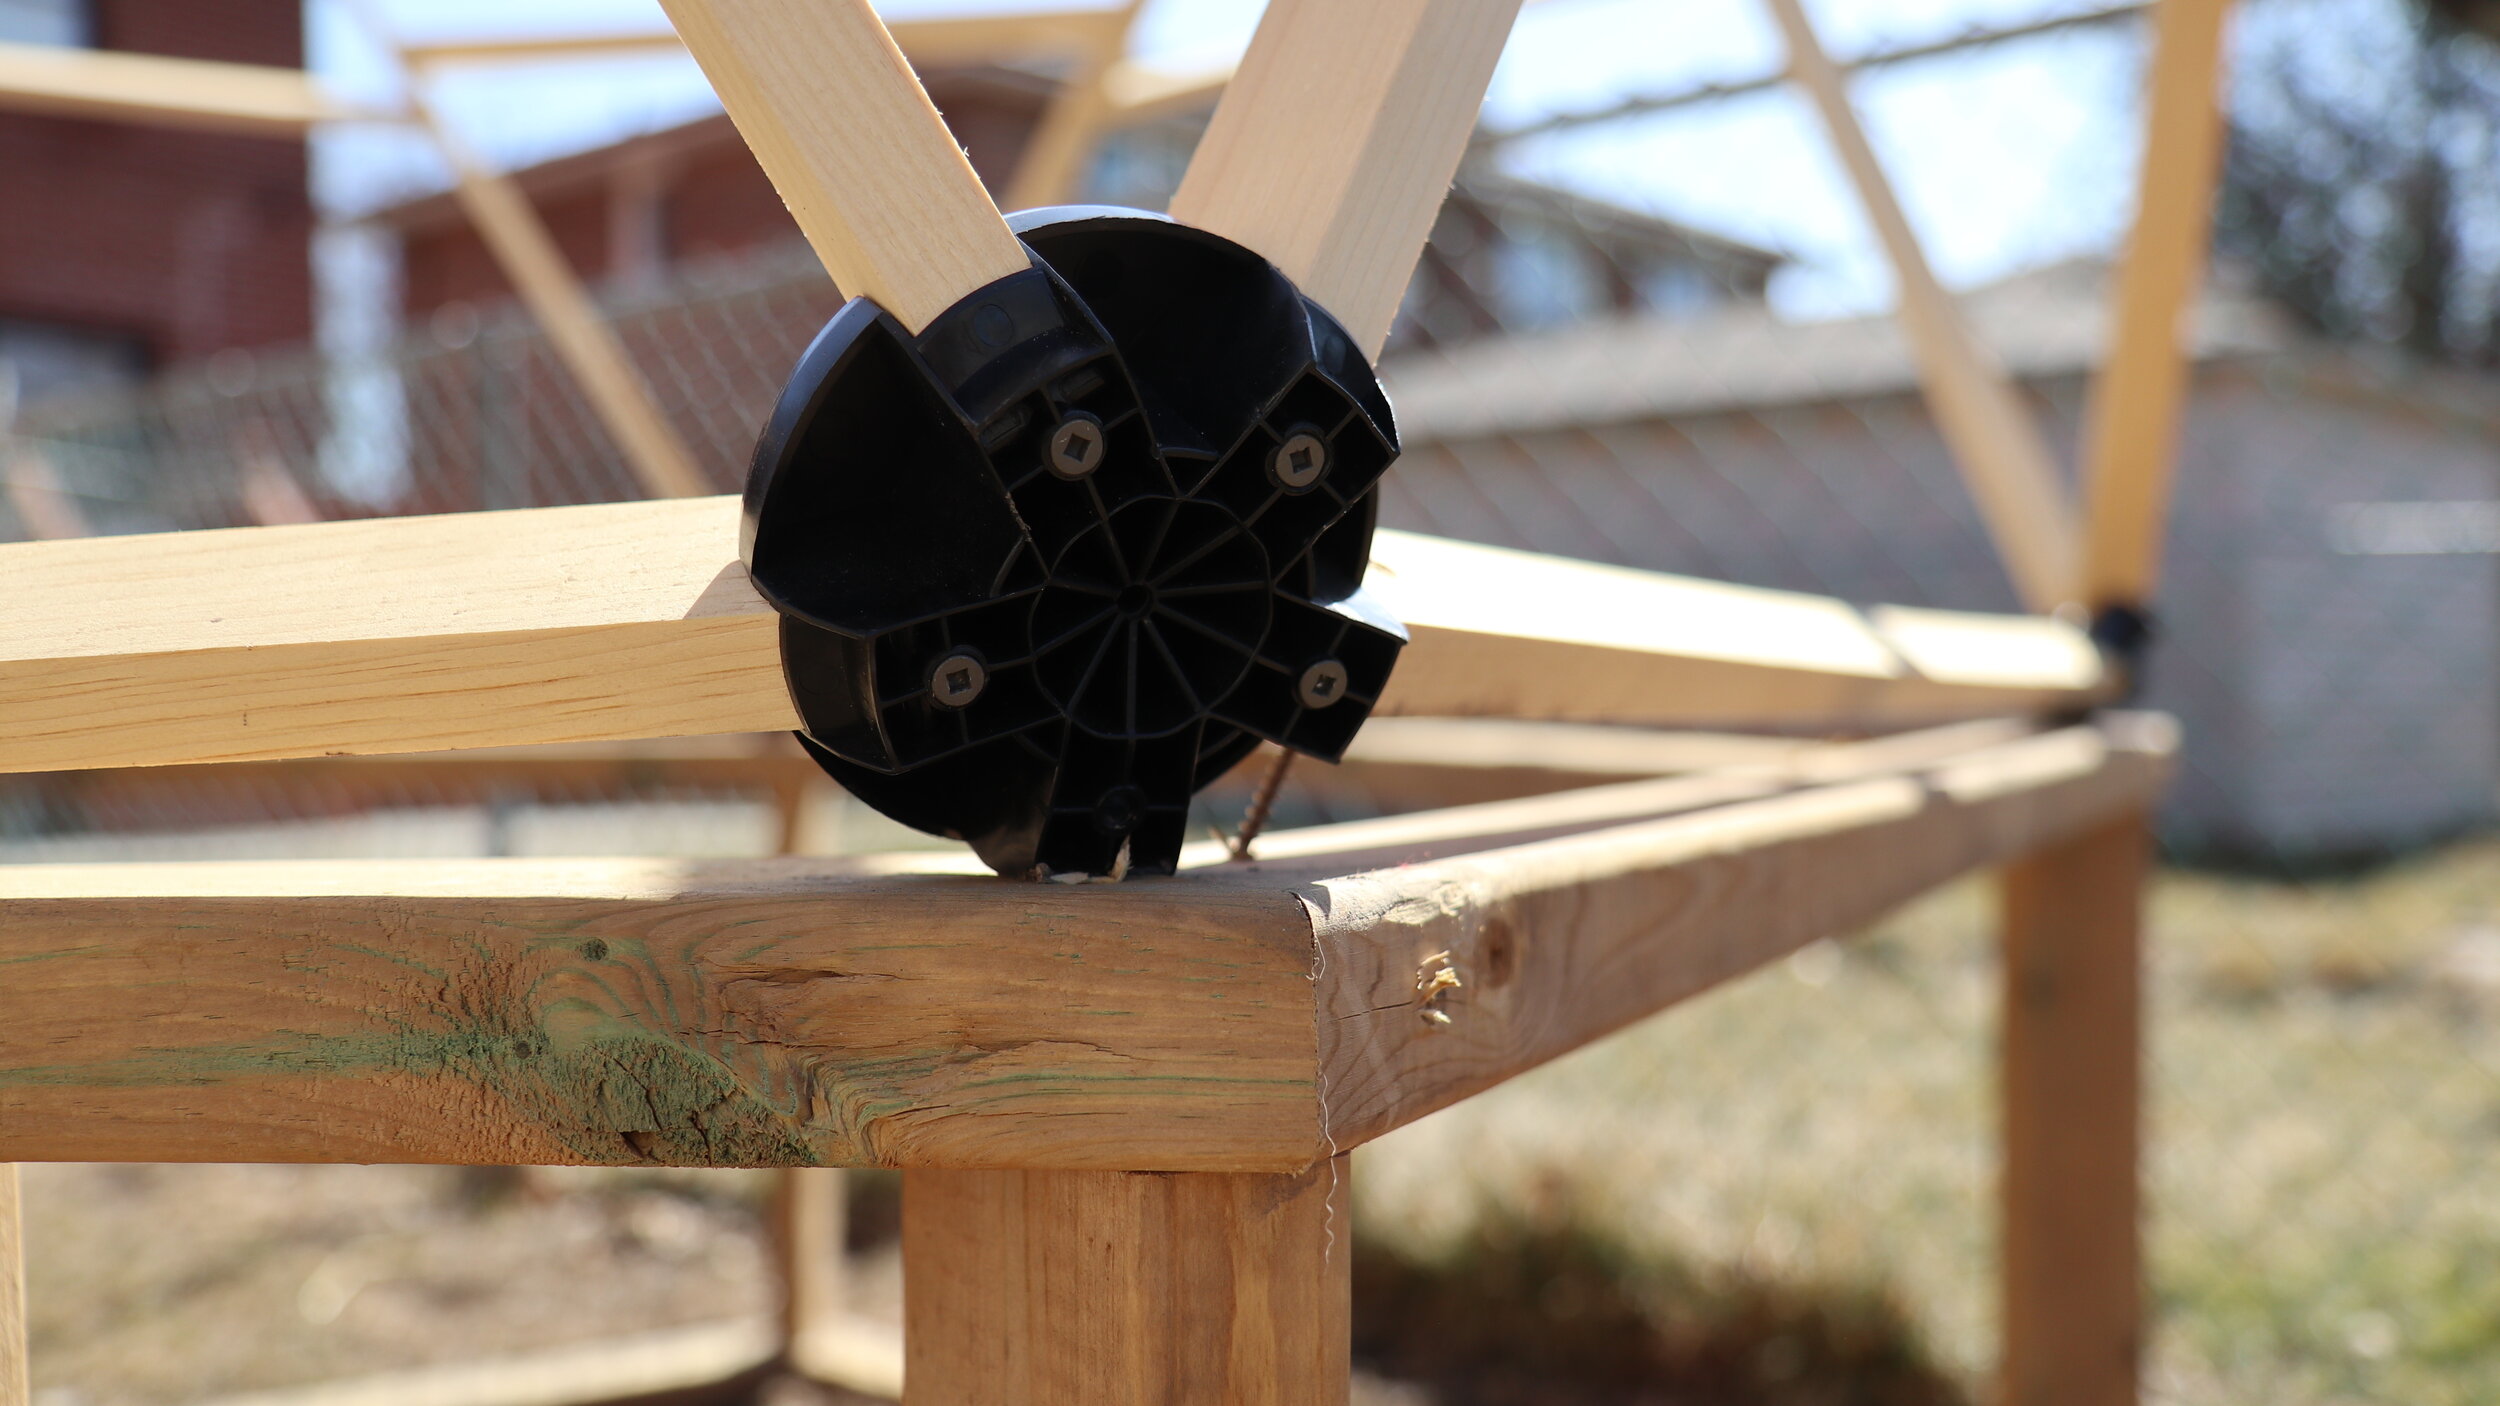
Geodome Customized Knee Wall
I had noticed that many of the very permanent and expensive geodome structures had knee walls. A knee wall is a short “half wall” typically under 3’ tall, or around knee height. I decided to include this concept in my geodome greenhouse construction. My plan was to lift the geodome kit, building a riser or knee wall base, to keep the small footprint but obtain the height I was after. A custom plan was hatched!
Like the rest of the Magidome options, this riser or knee wall was also fully scalable. It could be applied to any of the size options suggested. The additional benefit of this base was the weight. It helps to anchor the structure, and with that further anchoring into the ground, ensures that my greenhouse does not fly away or crash into my neighbours yard.

A custom knee wall lifts the Gedome kit, creating height for an adult to walk into the structure without sacrificing more area.
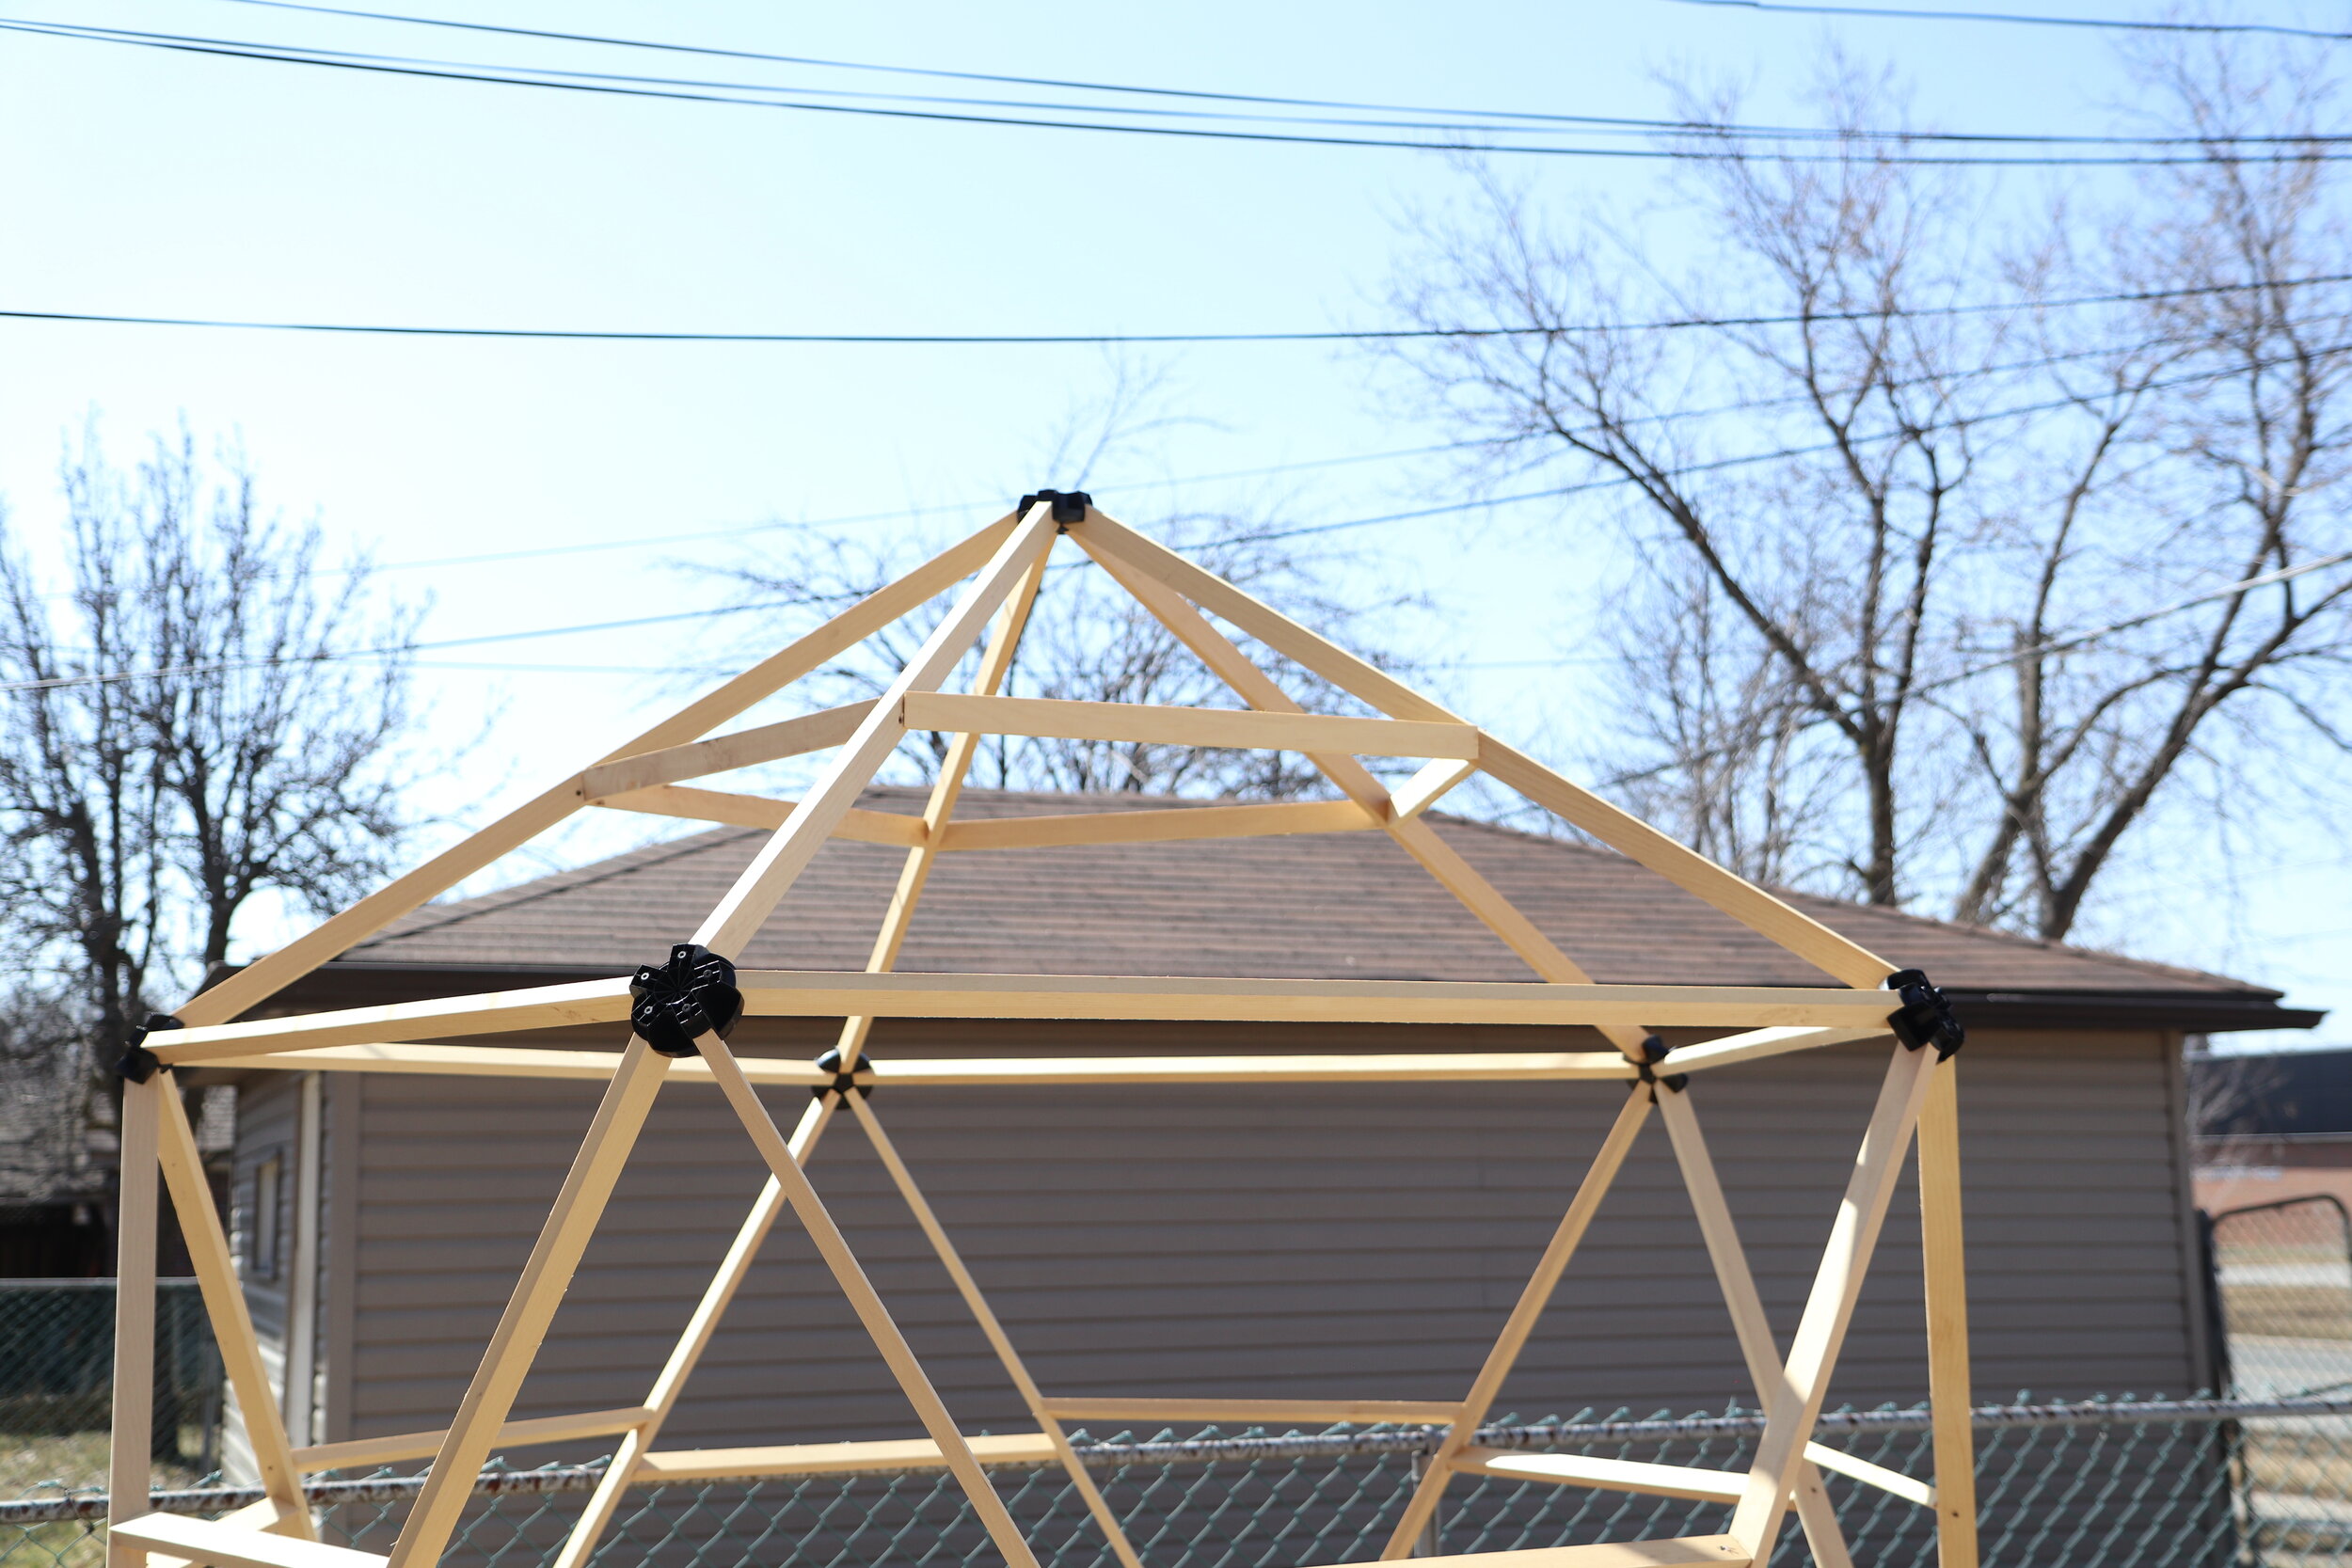
Cross bracing serves double duty as seating or plant ledges.
Within the knee wall, we included additional braces. These not only helped to solidify the structure, but also served as seats and plant ledges.
Custom Geodome Vents
Spring in Southern Ontario means cool air and hot sun. Even when we had snow on the ground, inside the dome temperatures reached 20°C on a sunny day. On a warmer spring day, temperatures climbed closer to 40°C when the dome was not vented or opened up. I wanted to grow plants, not cook them. The way I was able to work around this without any complicated construction was to wrap the ‘roof’ separate from the walls when tacking the poly.
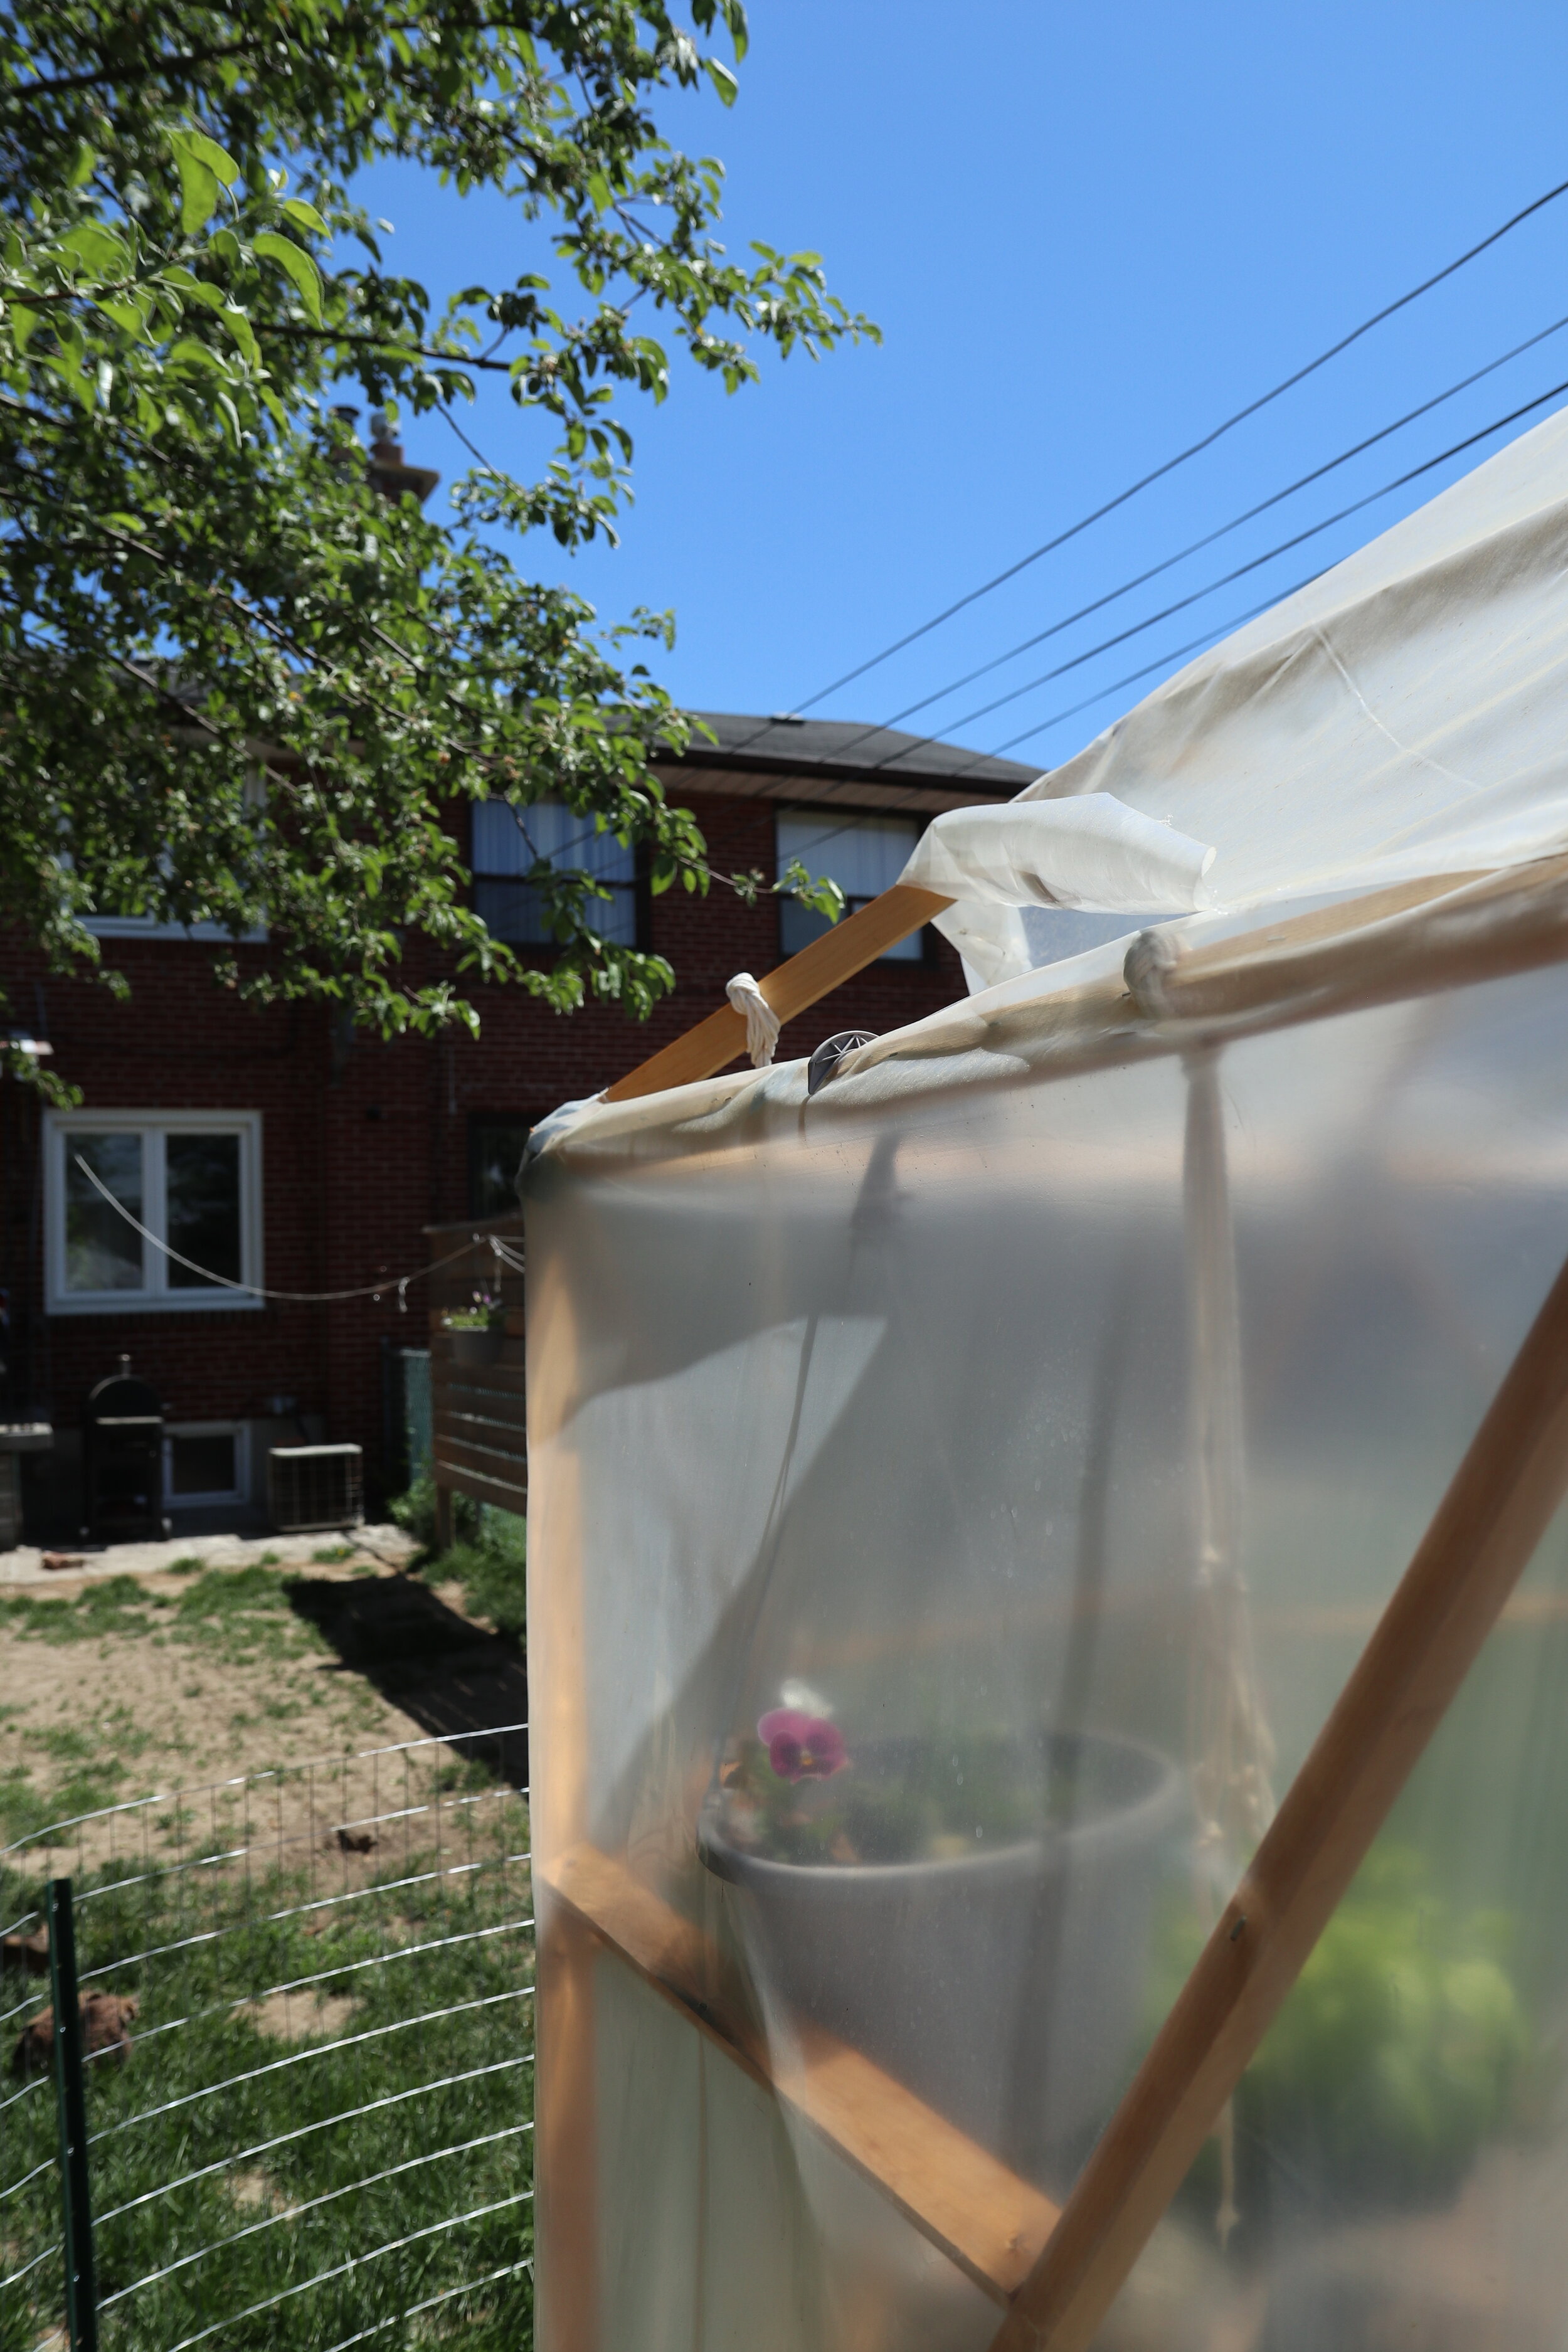
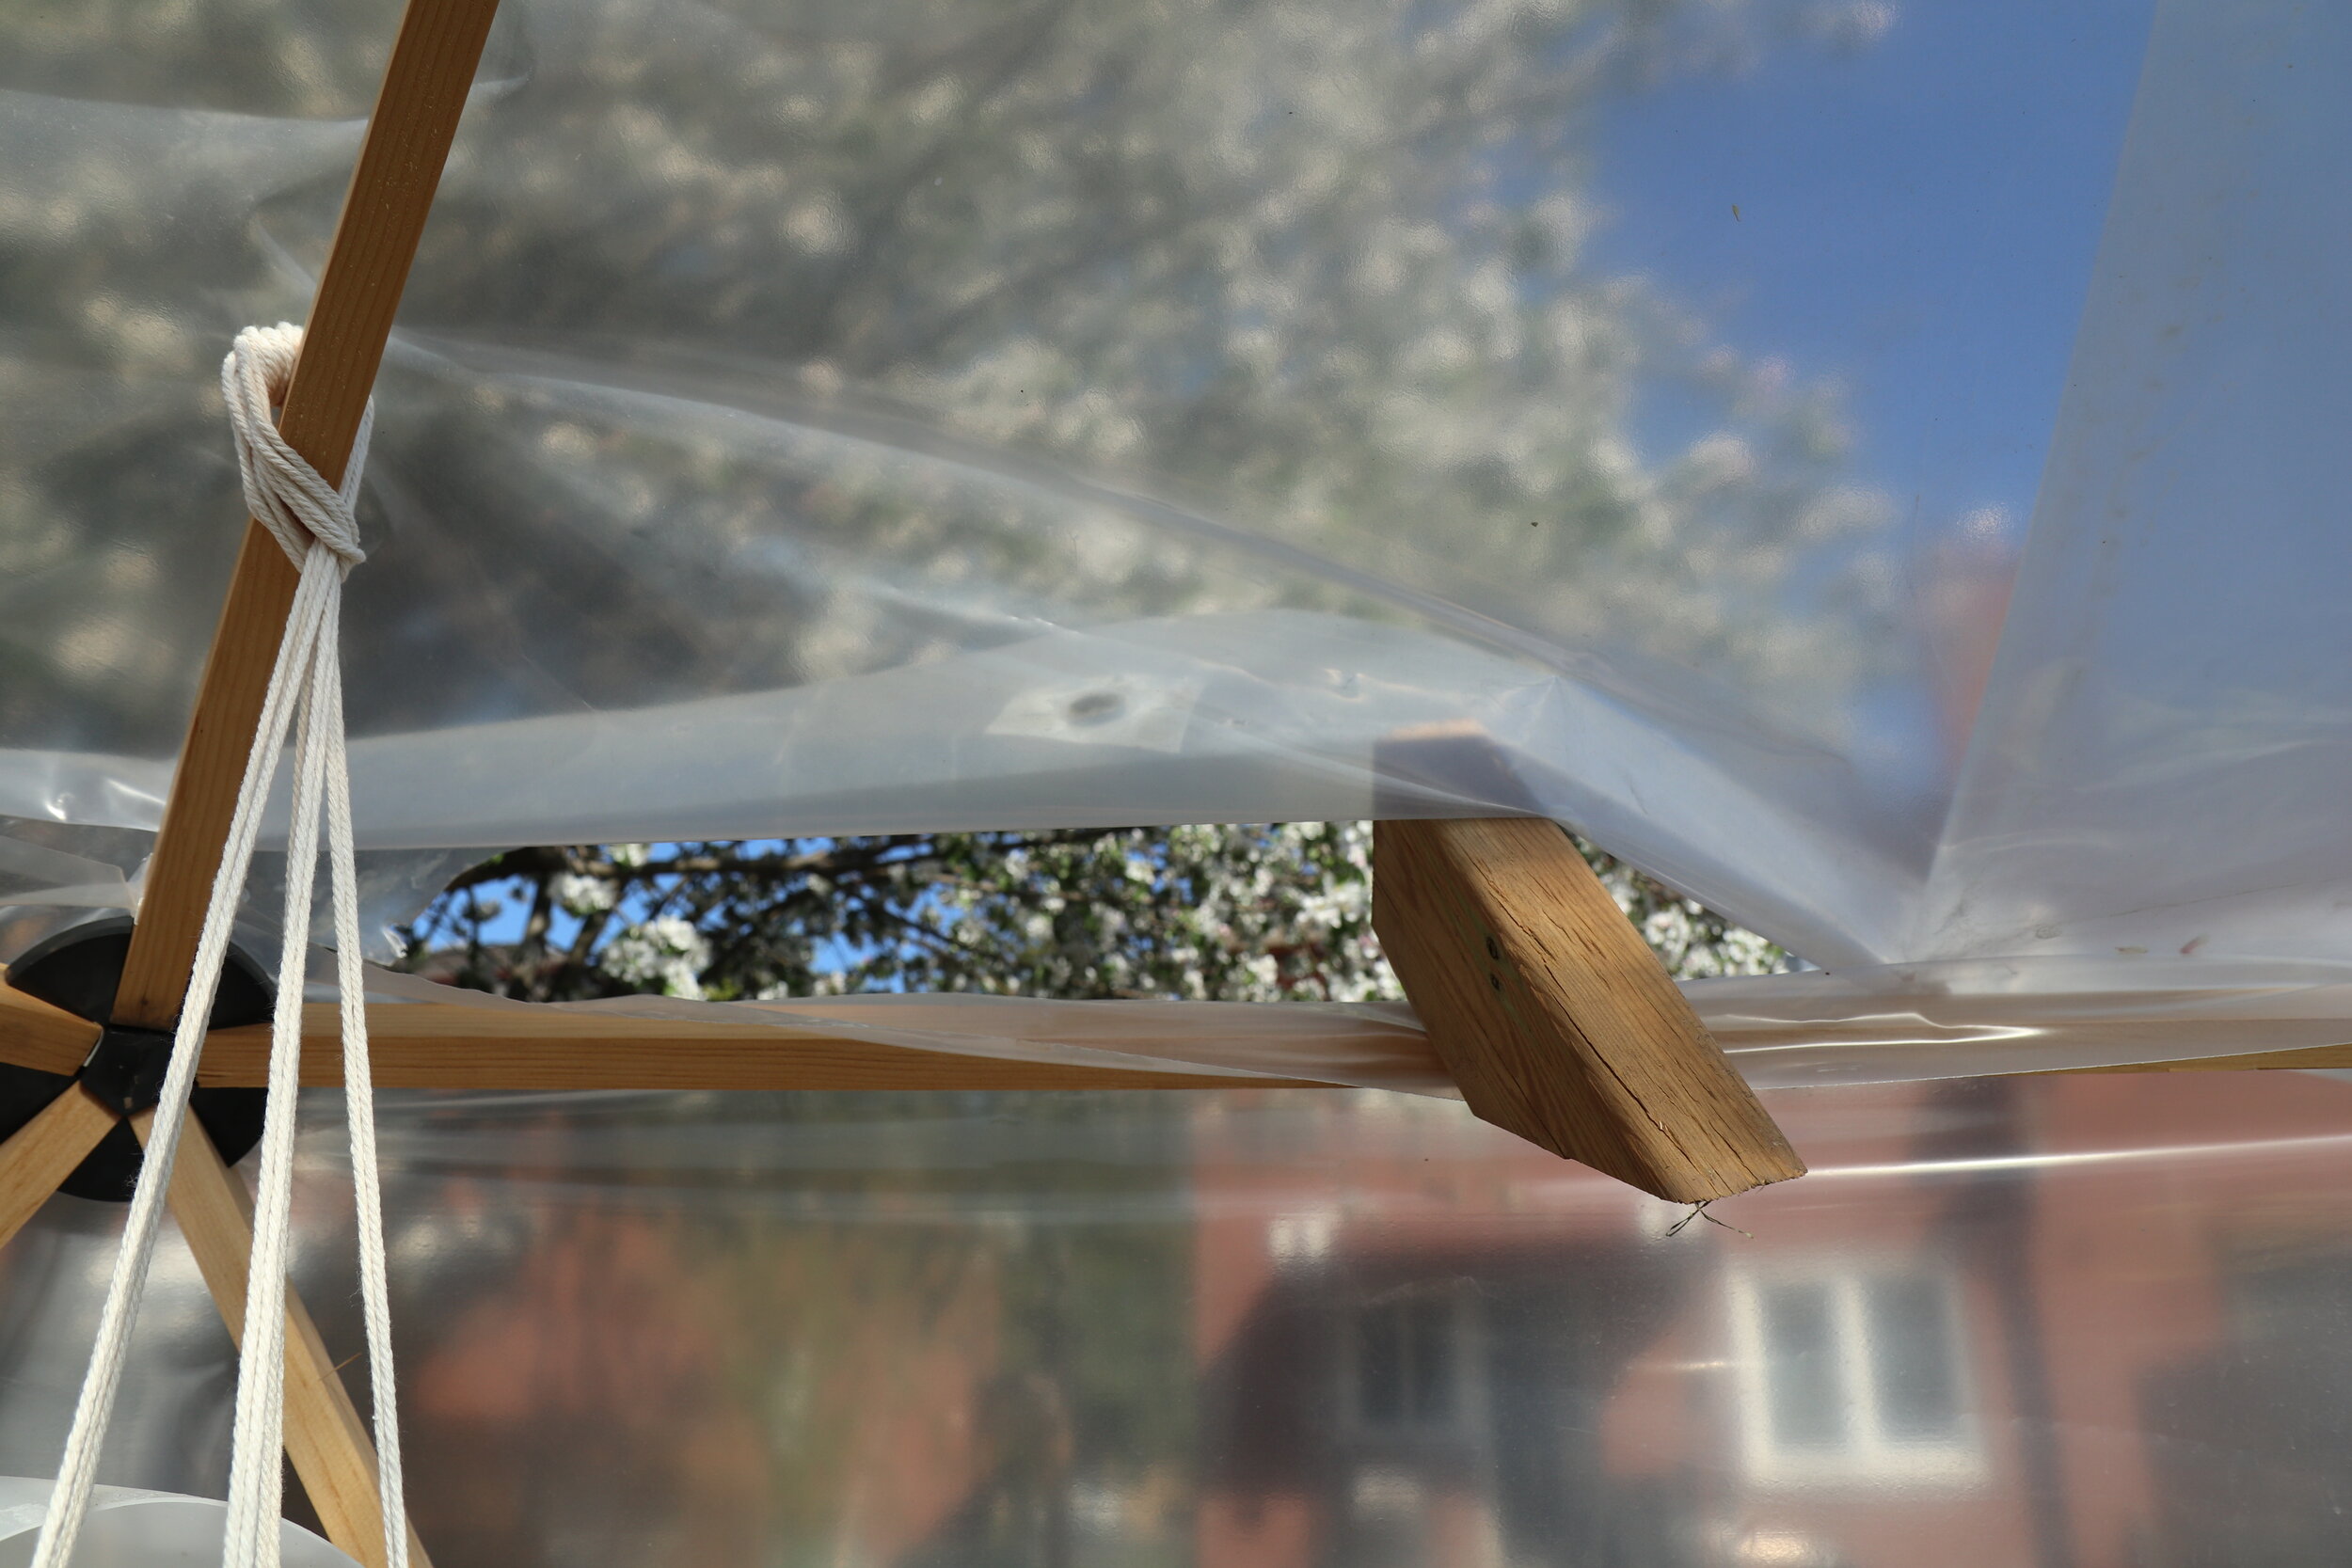
I covered the top segments in one full sheet of poly so that there would be no leaks. I allowed this to overhang the walls, creating a drip edge to shed water off the structure rather than into the geodome. I did not tack the poly to the wood around the perimeter. This meant I could prop open the poly from all sides, taking advantage of wind patterns and incorporating passive cooling methods.
My prop, was simply offcuts from the 2x4’s used to construct the knee wall. Reduce, reuse, recycle!
As the season progressed I pulled the plastic back further, leaving large sections of the roof open. This allowed the dome to maintain a nice breeze and ensured that it will also be safe as a playstructure later in the season.

Passive Wind Cooling Diagram
Custom Geodome Door
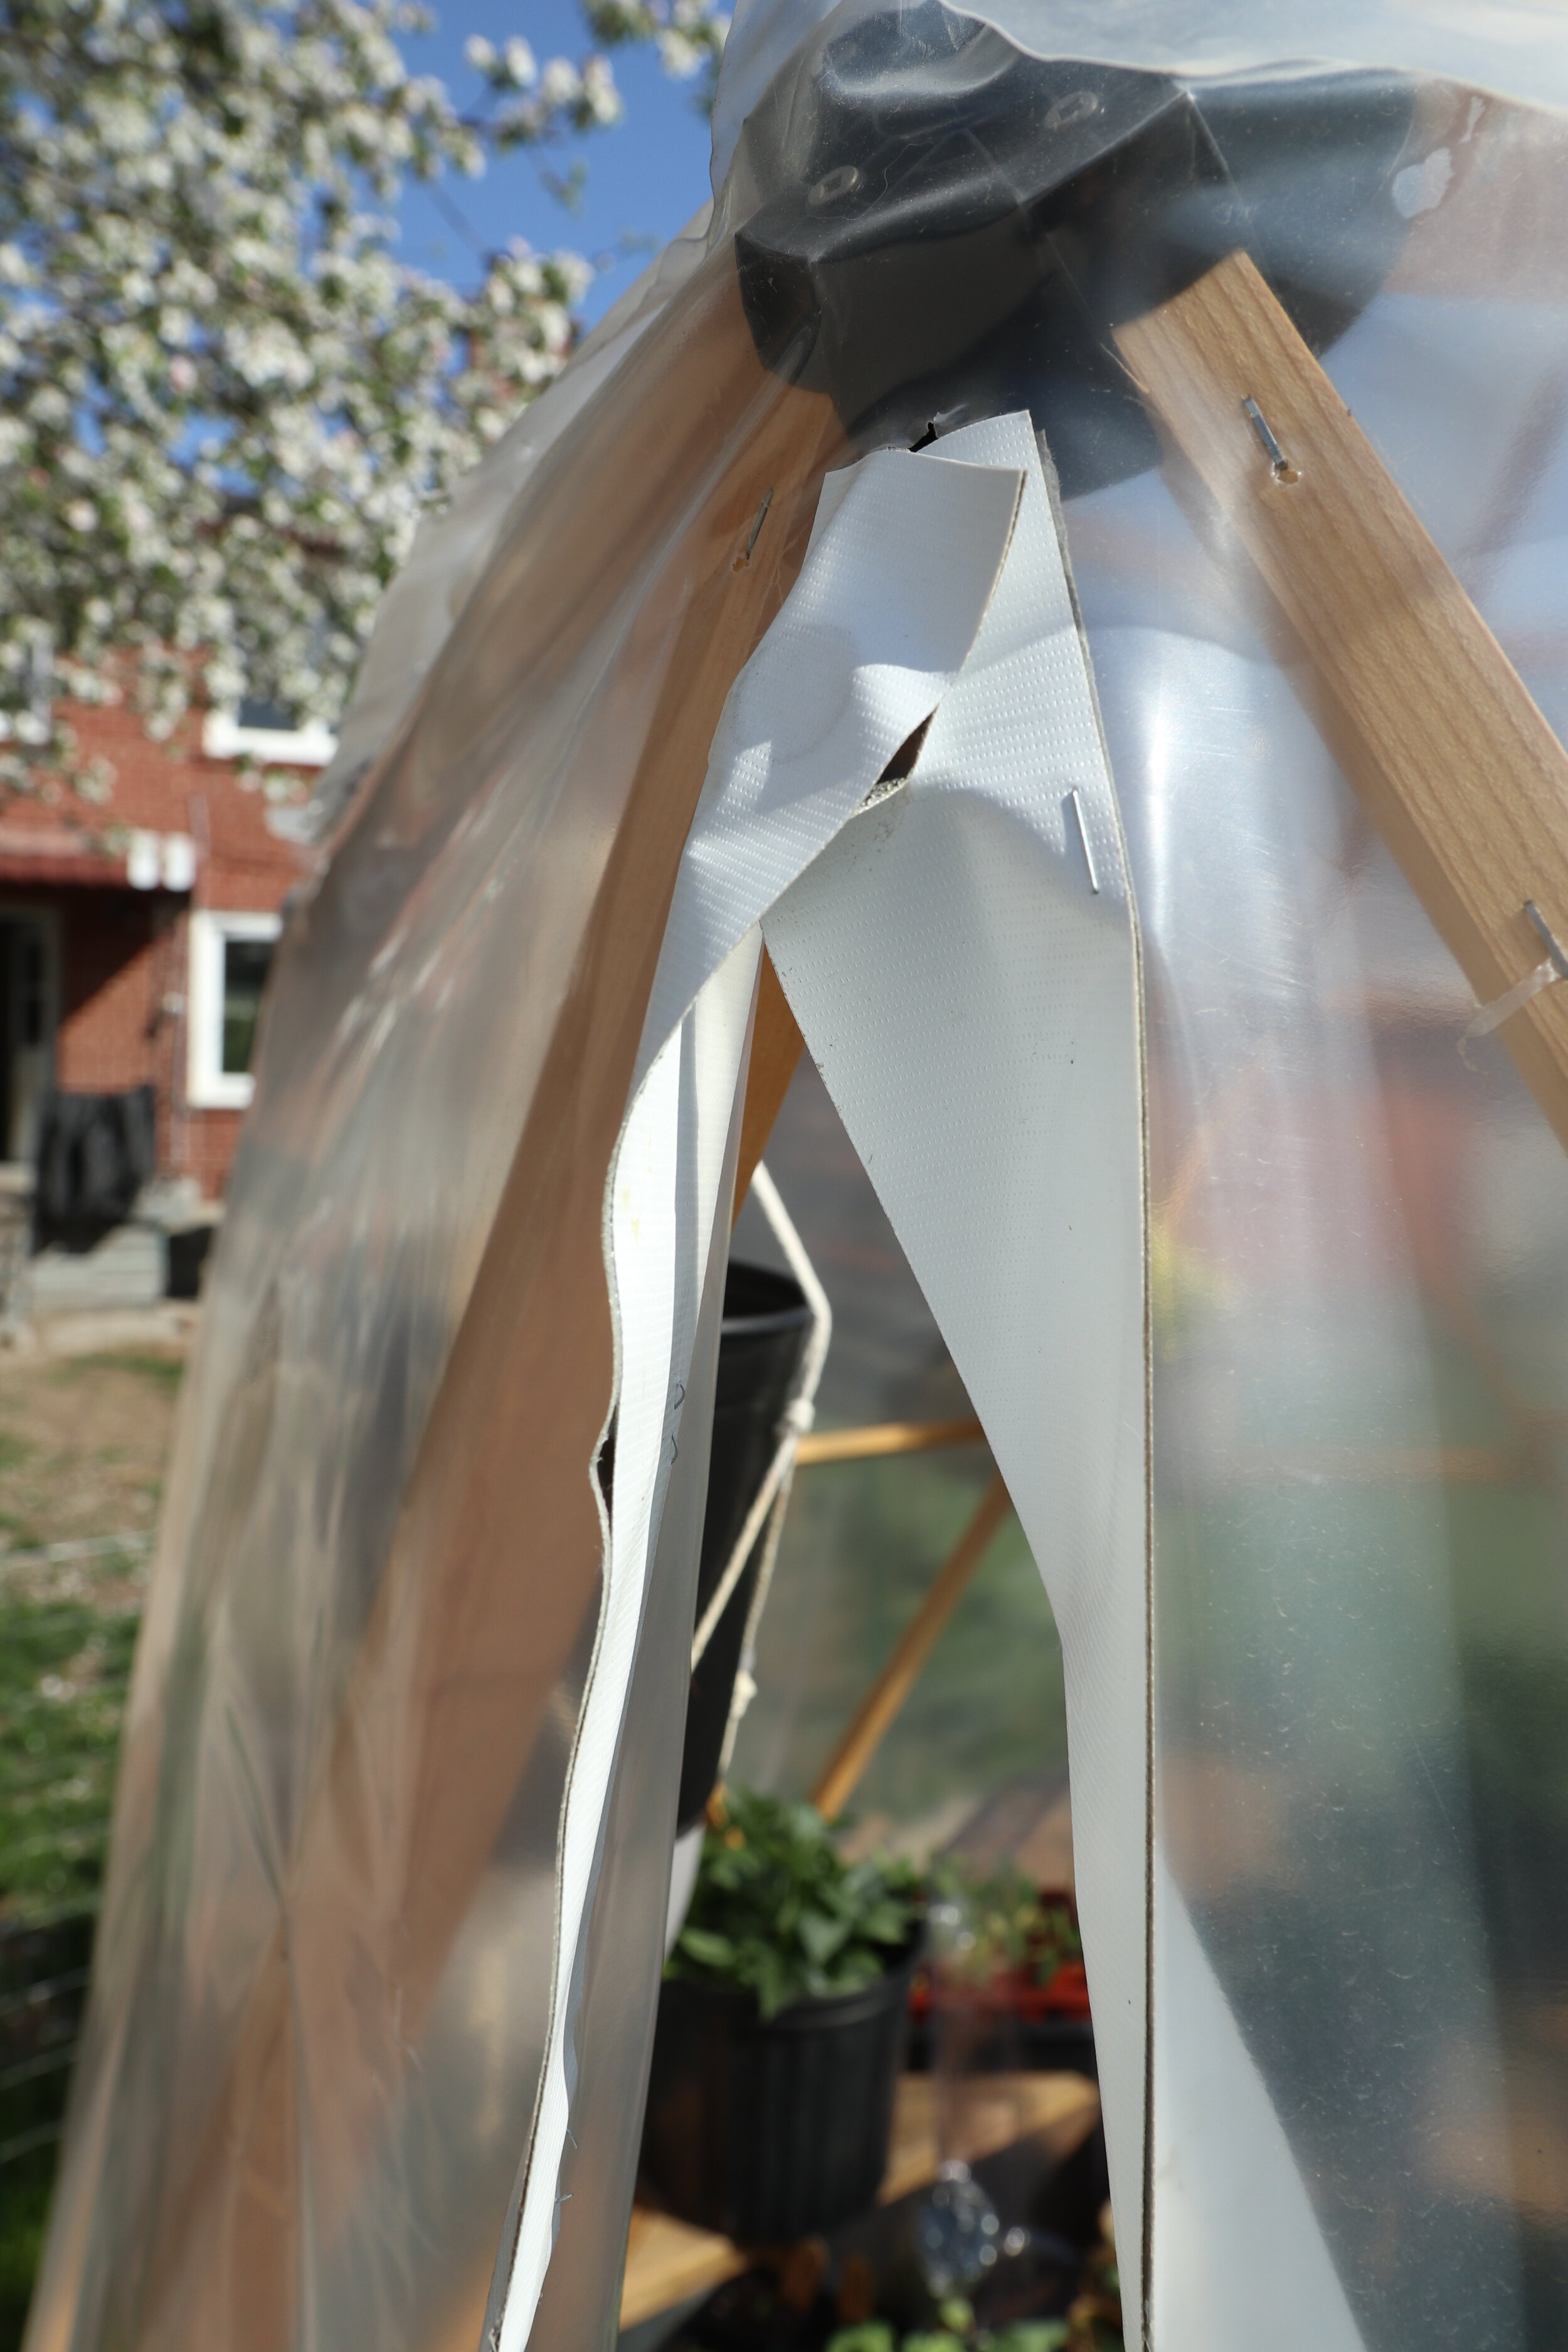
Creating a working door was the trickiest customization for my geodome. To frame in a door seemed to be a lot of extra wood, material and effort. I pictured in my head something like a camping tent. A simple slice in the poly and then ‘something’ to seal that slice.
Lesson learned; nothing wants to adhere to poly. There is tuck tape, but that is usually a bold red colour and getting picky with aesthetics, was a look I wanted to avoid.
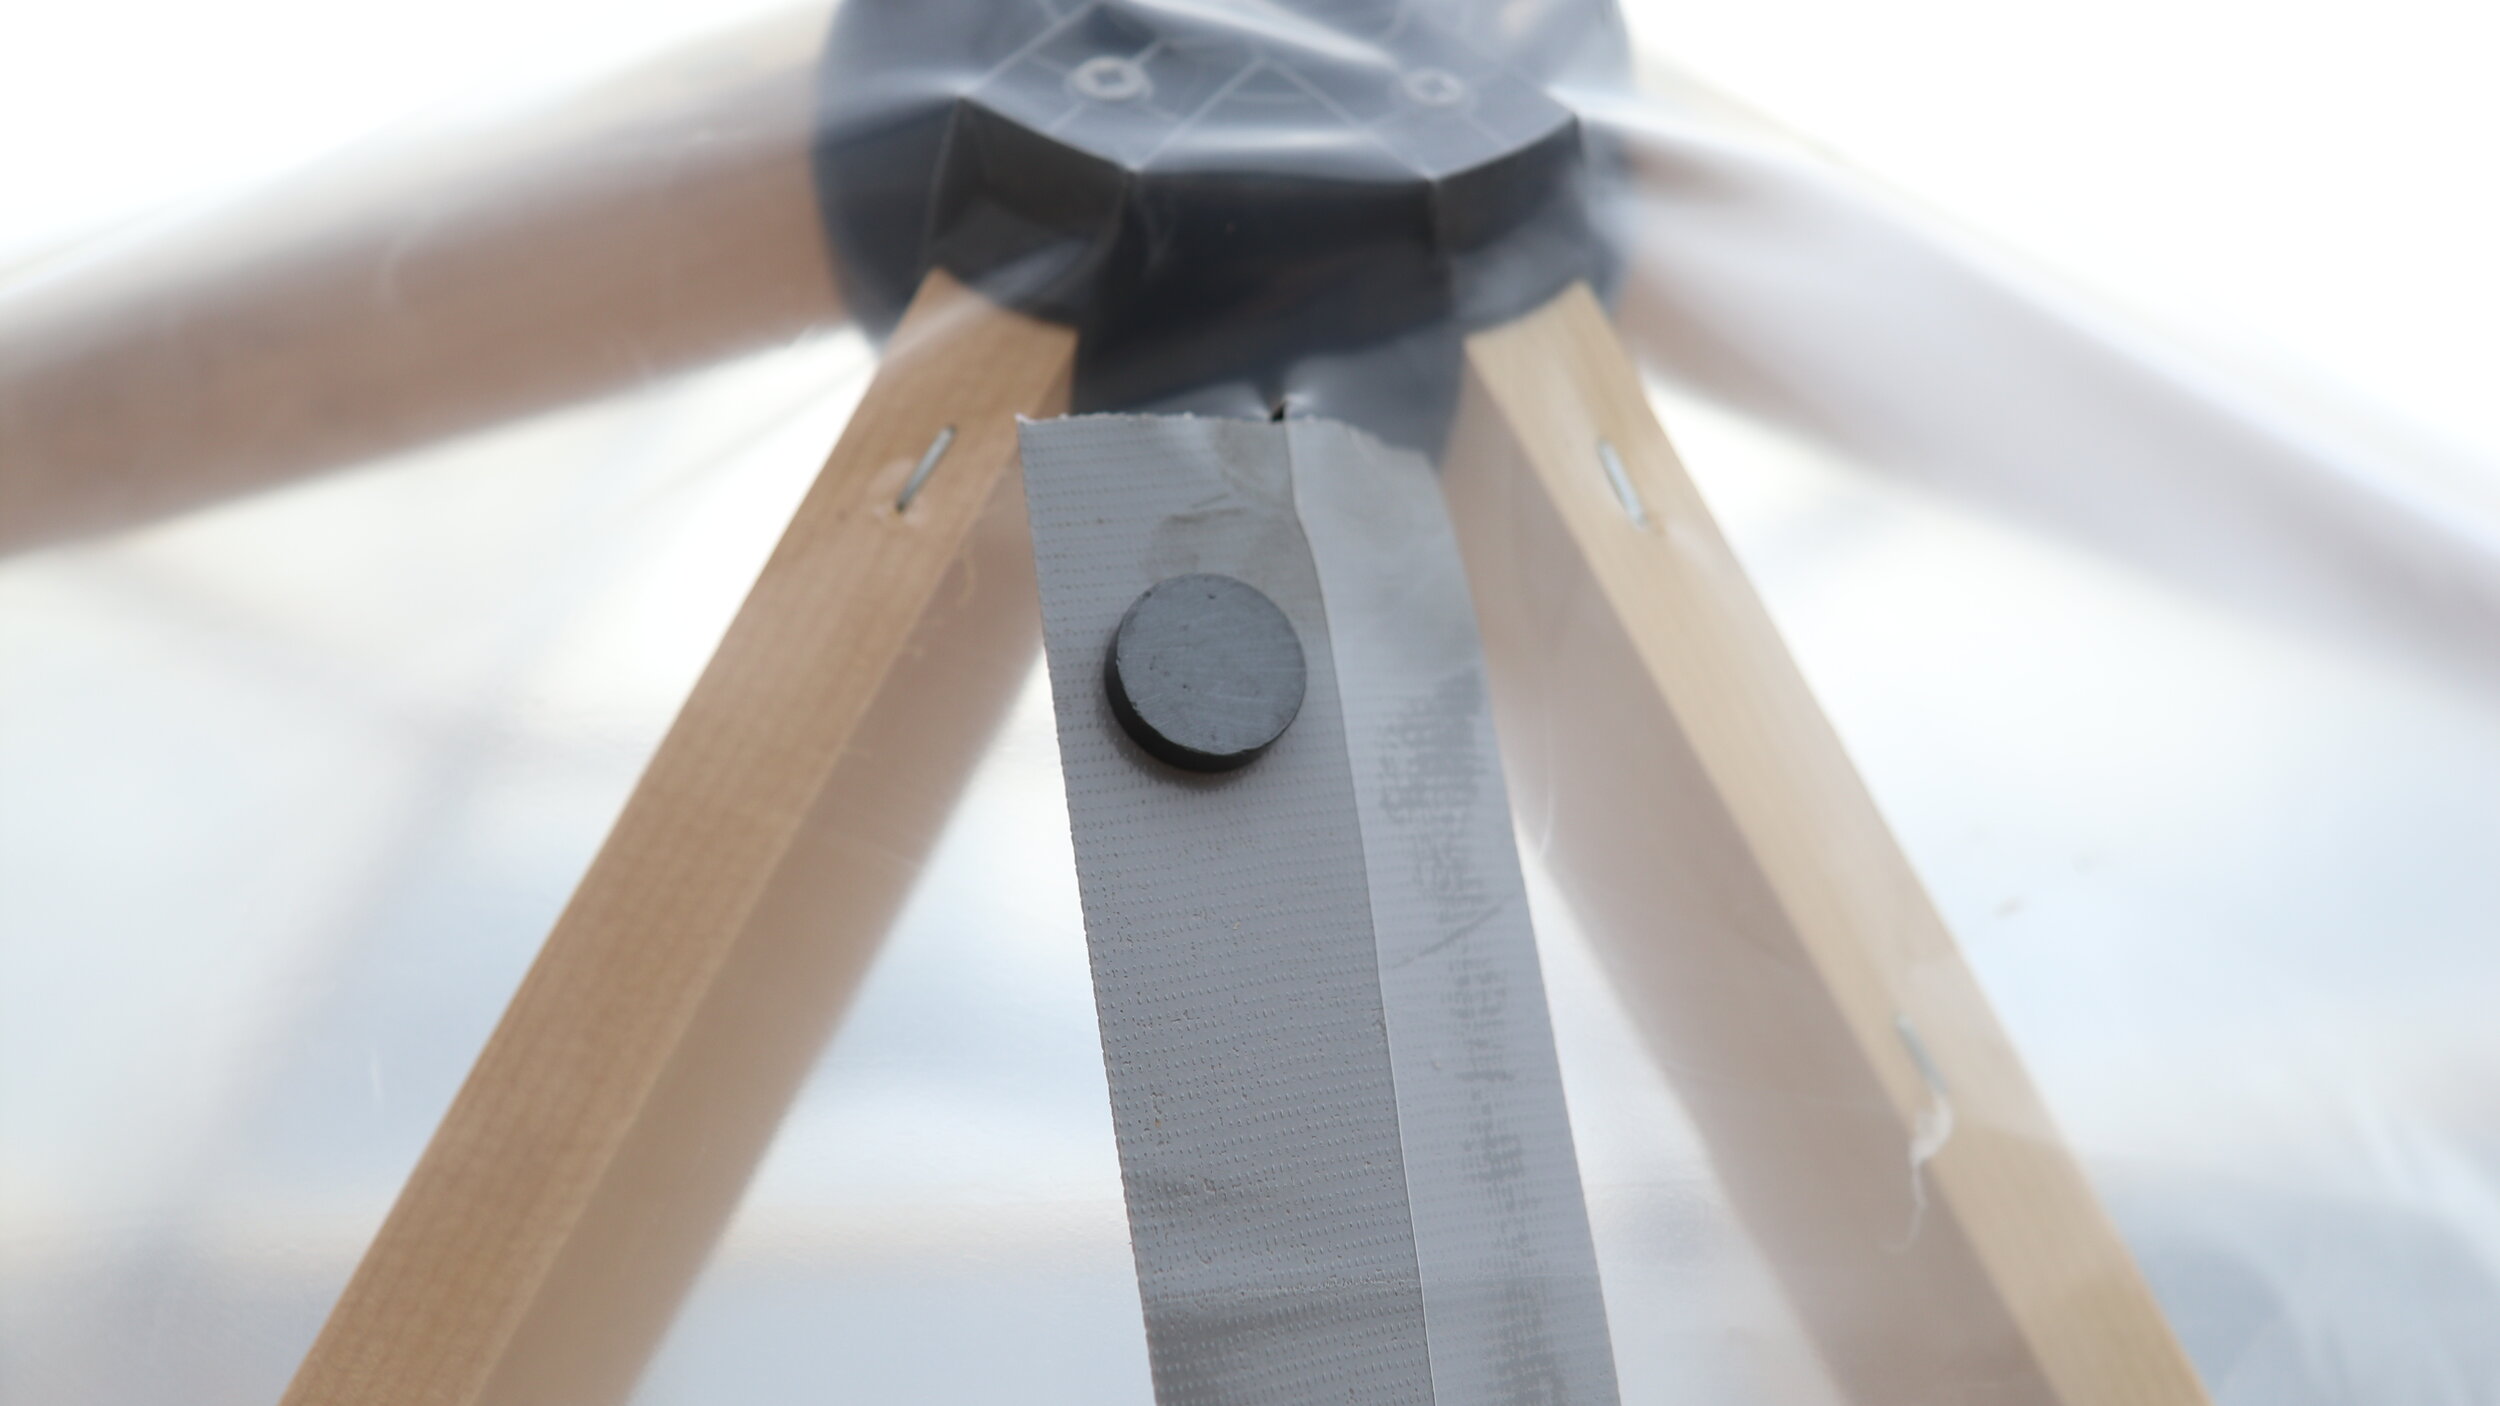
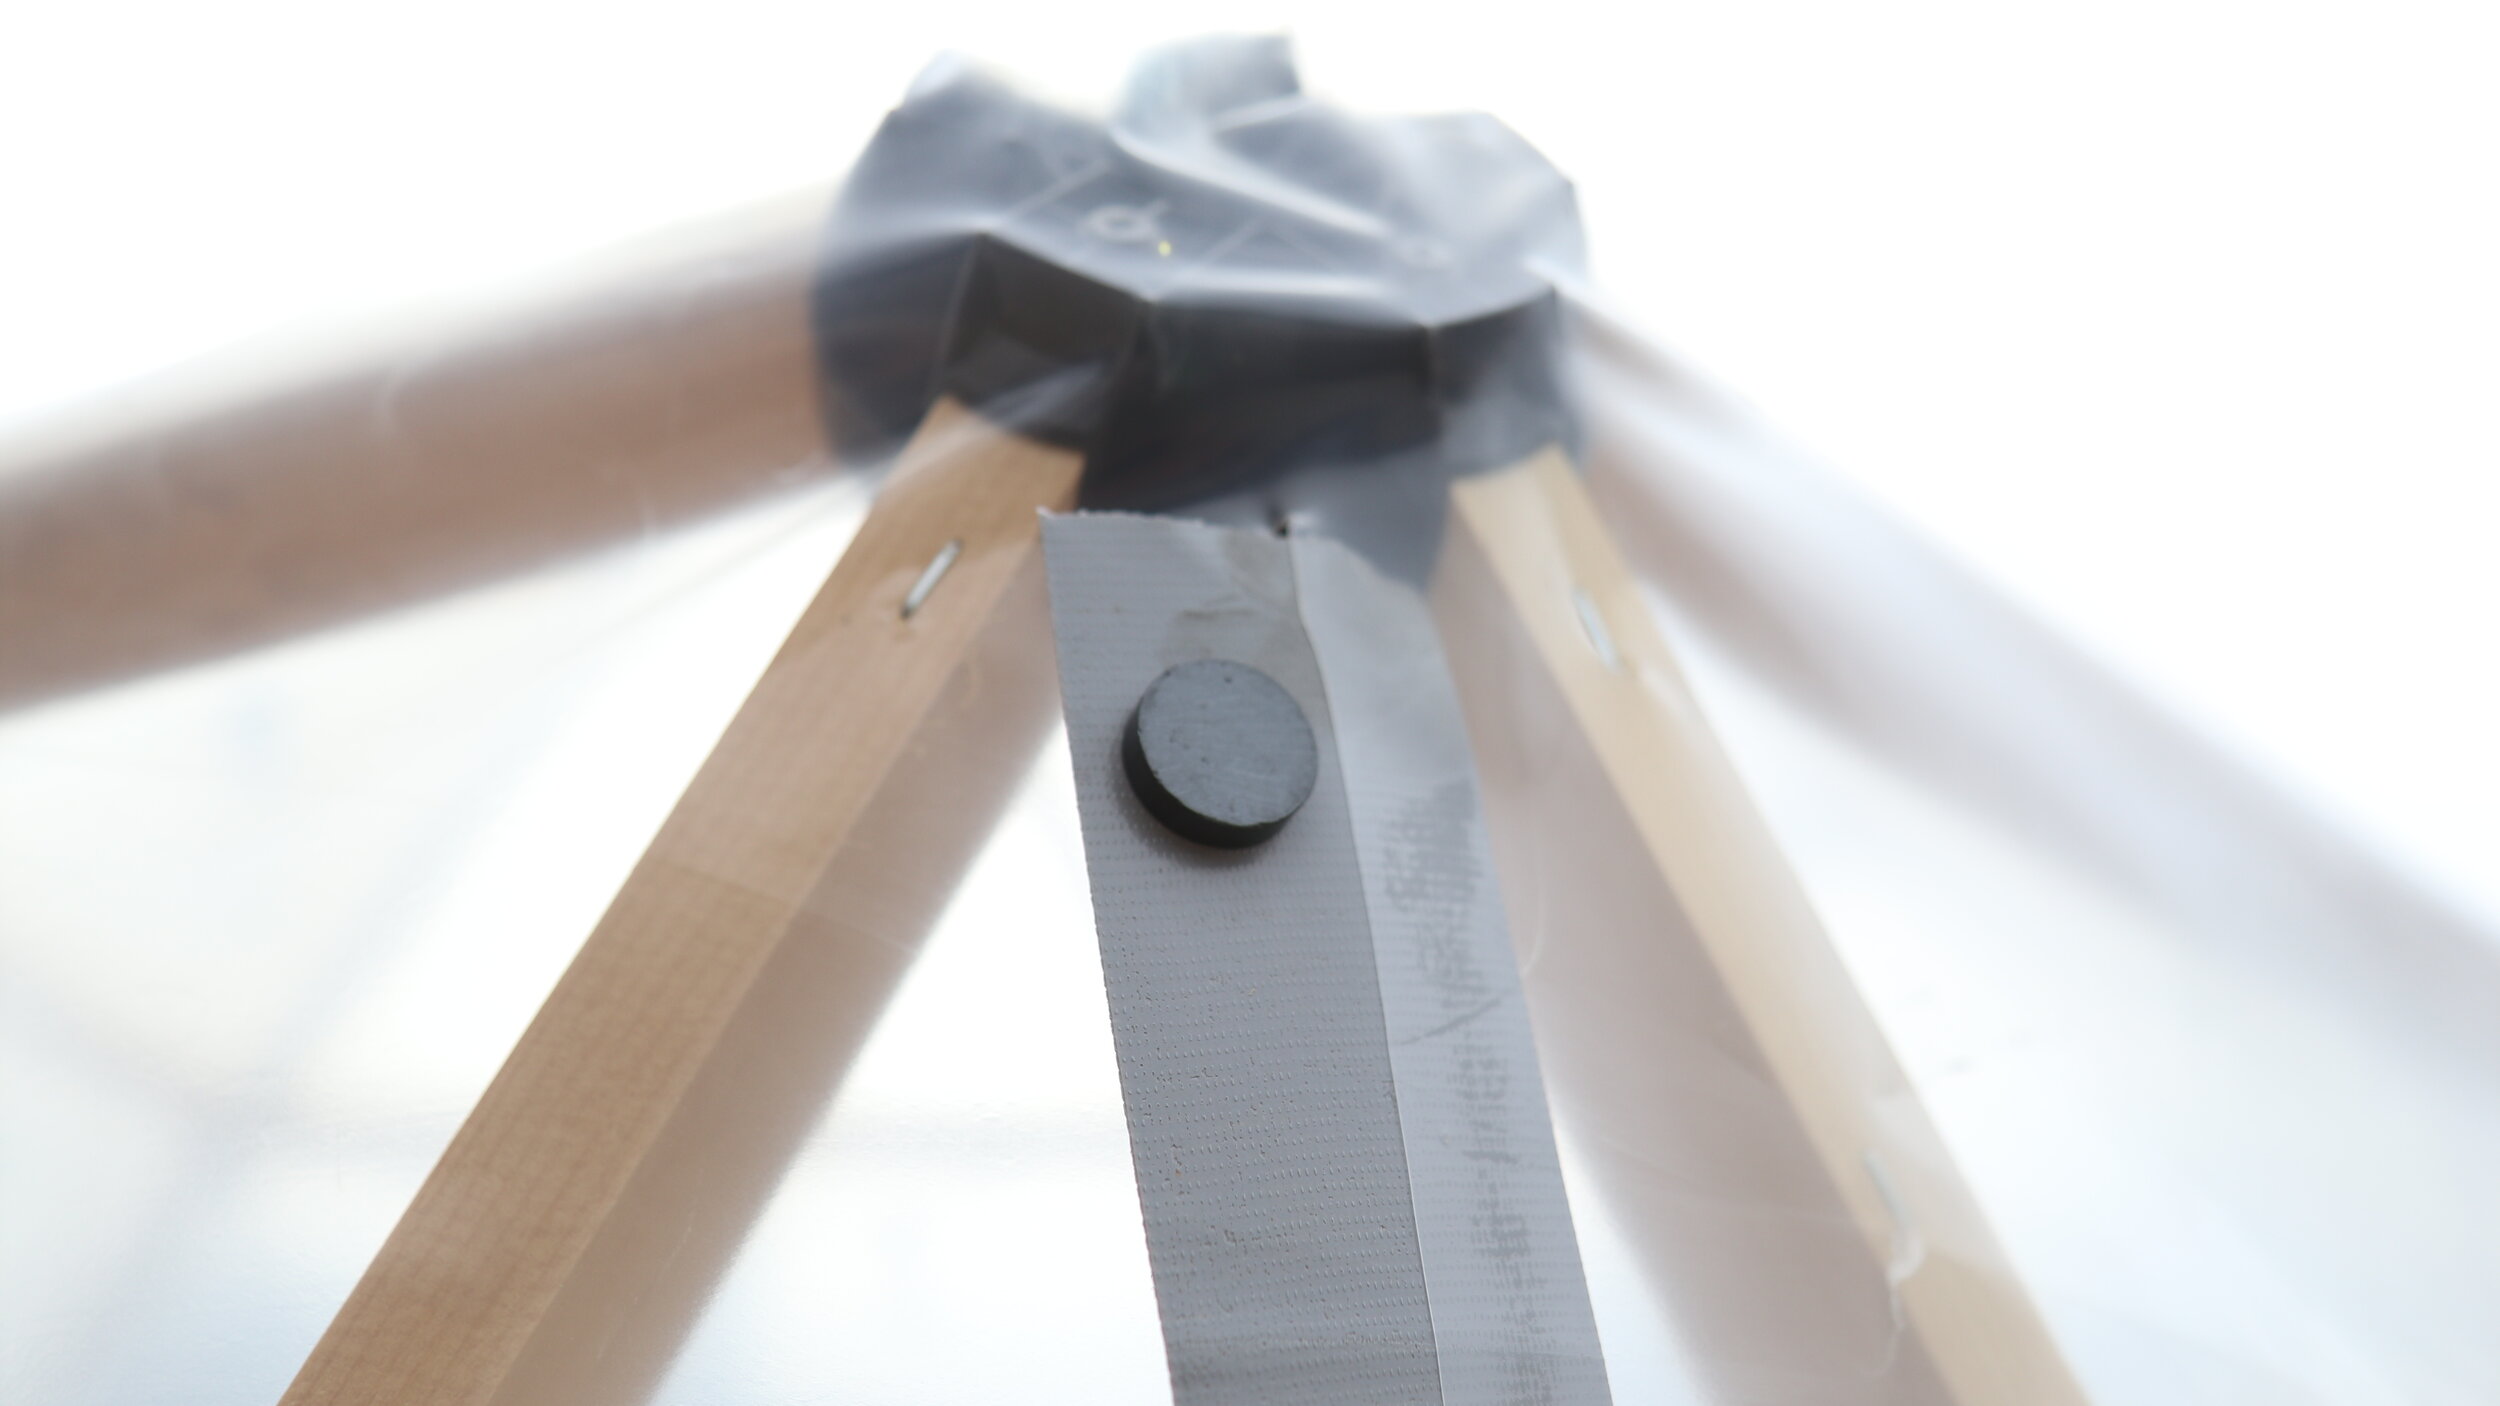
Velcro: Not even exterior grade, using gorilla glue plus stapling, velcro would adhere to the poly. The velcro was so strong that it pulled off the poly before it pulled away from it’s better half. This option was a failure.
Magnets: If magnetic screens can handle dogs running through them I figured they should be able to handle the occasional entry to a greenhouse. To create an overlap so that the magnets would connect, I lined the opening with duct tape (I know, how very Canadian of me). Only half the width of the duct tape was applied to the poly, the other half is where the magnets were placed. I then sandwiched the magnets and poly edge with a second strip of duct tape. The key to this working was the brand of duct tape. Gorilla duct tape was the only brand that adhered with longevity. 3M and Duck Tape brands both failed when exposed to the elements.
Magnets are another science lesson as there are many types. For this project I needed them to stick to each other. I used round ceramic magnets from Michaels but they are a crafting staple and available in many crafting stores and on Amazon.
The one caveat to the magnet solution. Heavy storms sent the doors flapping. My solution to the two times this occurred, was to place a chair inside the dome, back to the door. A binder clip at the base of the door, pinching the two flaps together and a second chair outside the door. This braced the poly against large gusts and even kept my dahlias toasty during sub zero storms.
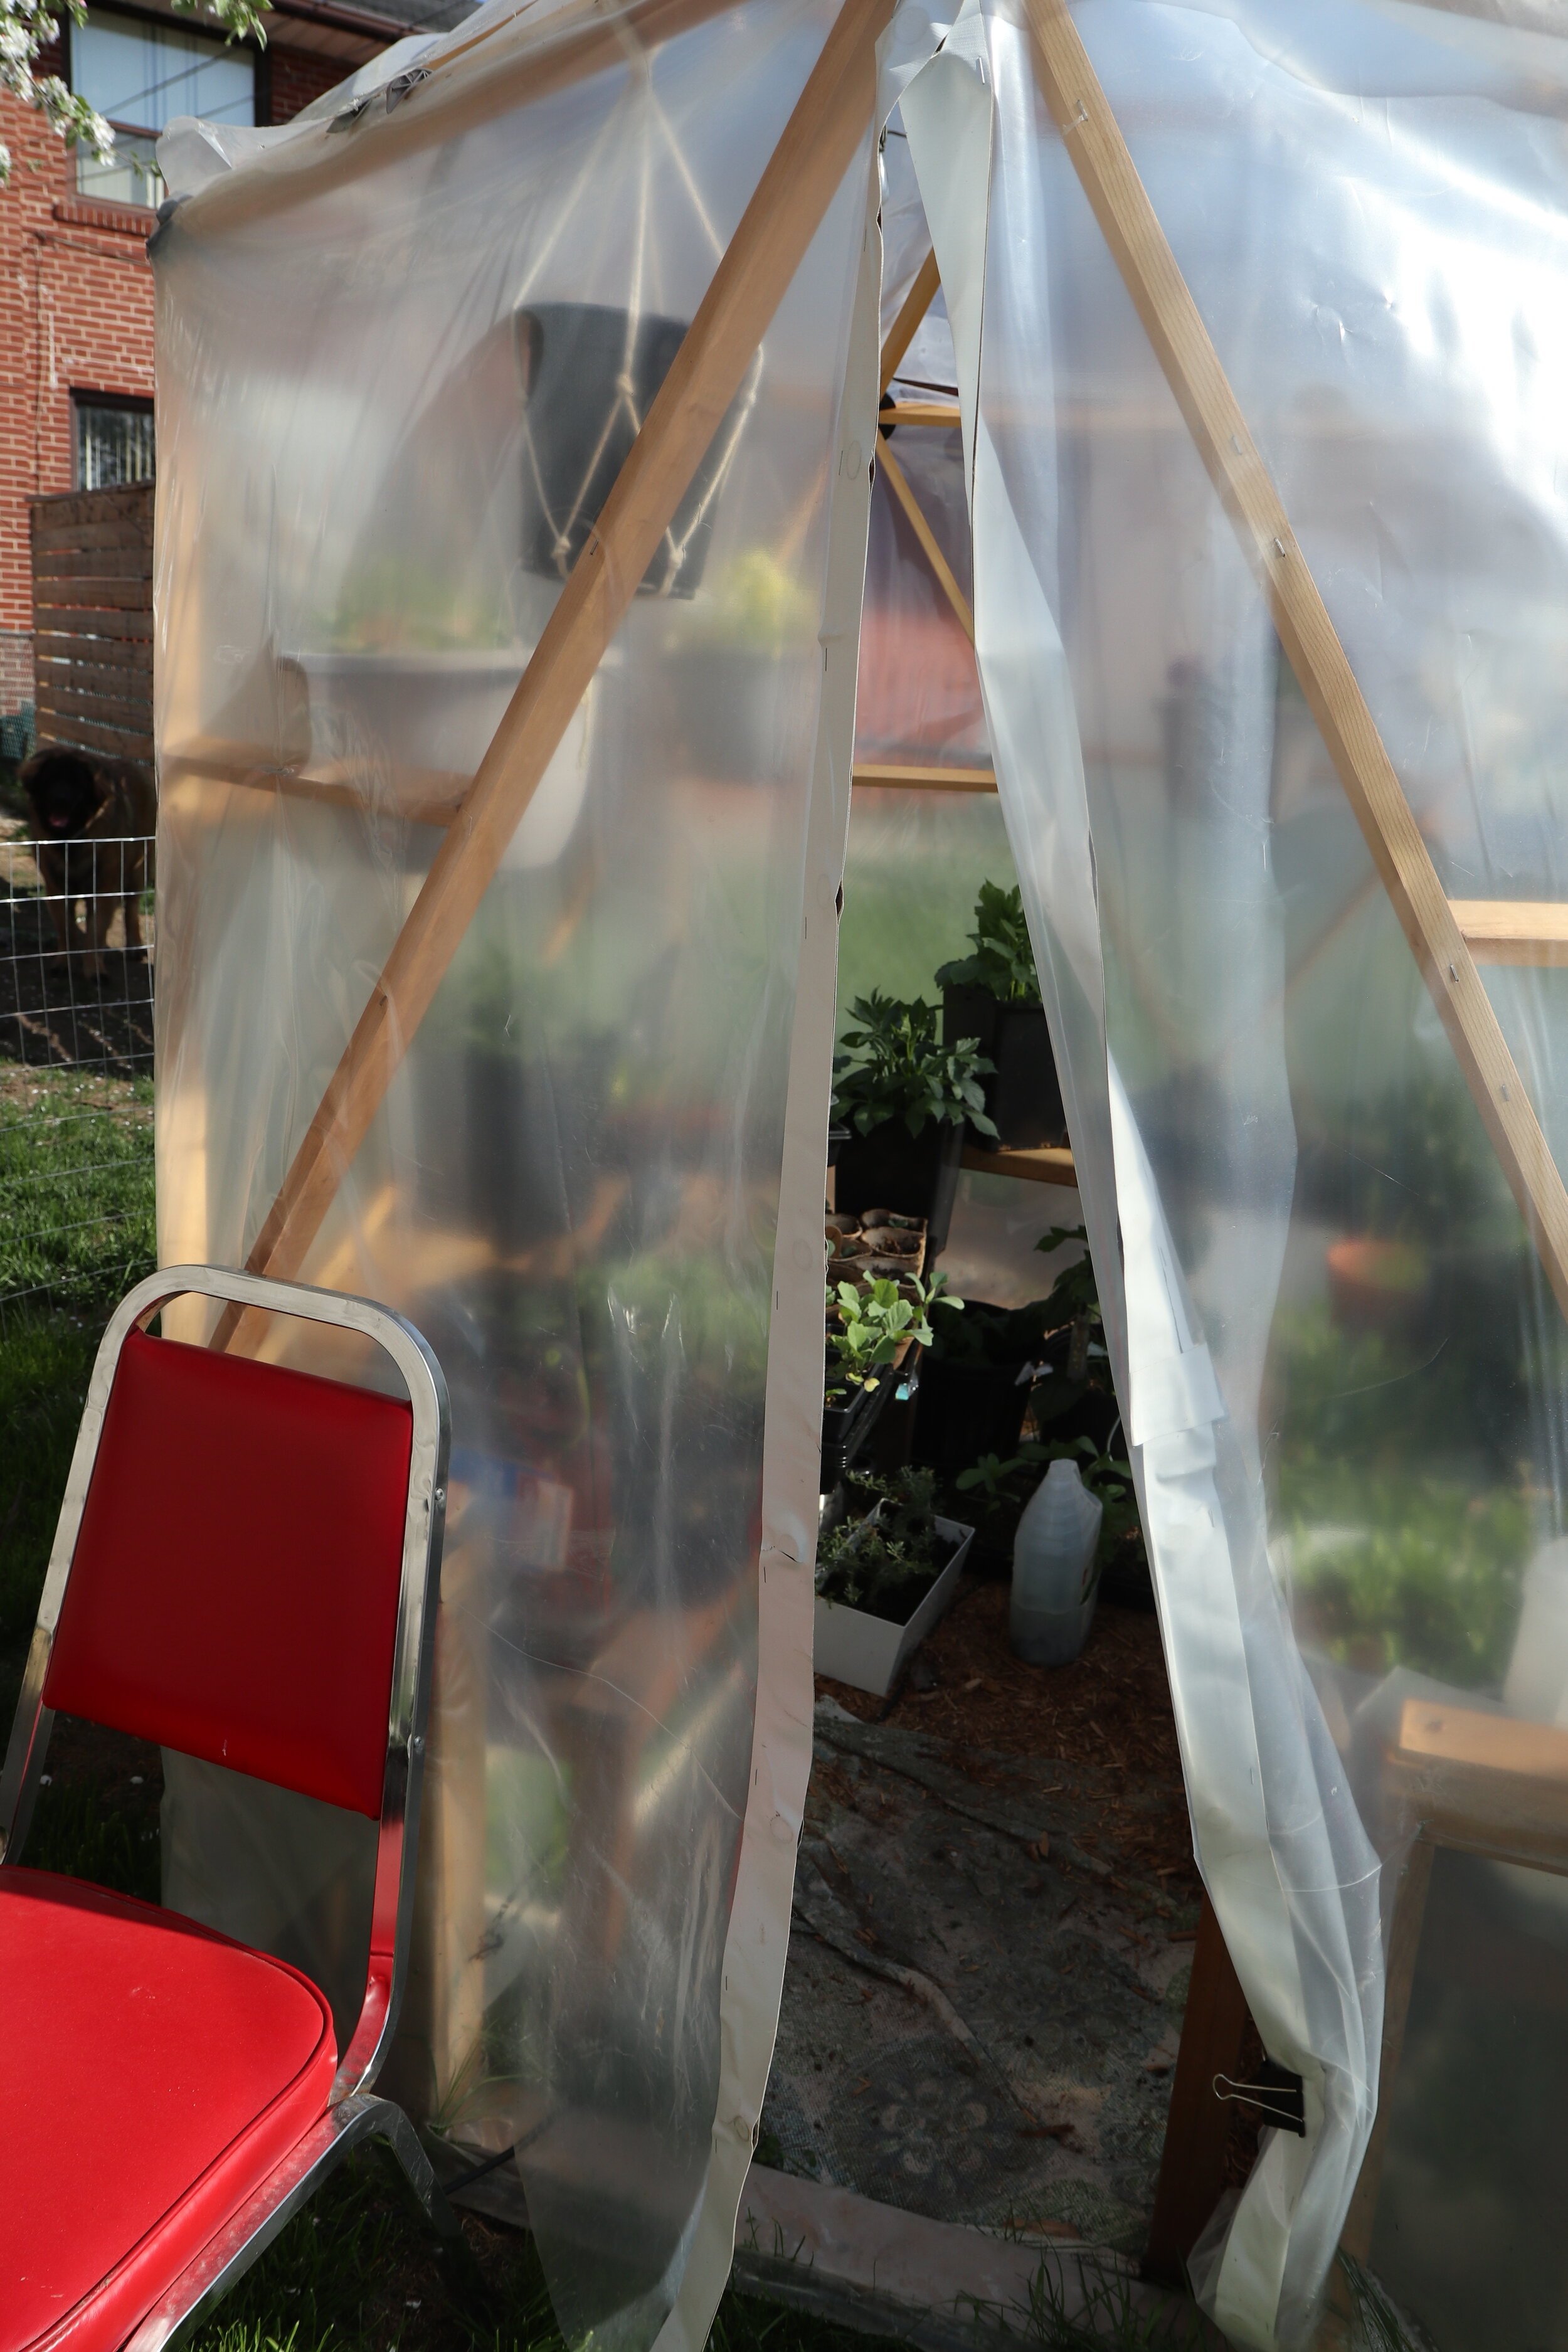
Zipper: If the magnet option didn’t work the next route I planned to take was using a zipper. These are often used to seal off construction zones or when removing asbestos. You can check local availability here. I did not go for this option first, due to the motor control a zipper requires. I want the structure to serve multiple purposes and my young kids (toddler and preschool) needed to be able to get out without assistance. If you do not plan to use the structure as a play-fort, a zipper would seal against storms more securely.
Wrapping the Geodome Greenhouse
By wrapping the roof and walls separately, this task was much quicker then anticipated.
Base: Before we anchored the structure, with the help of my brother, I rolled a layer of poly under the entire structure. I wanted a layer to be between the wood and earth, to extend it’s life. Similar to a pie shell, the poly came up the sides only enough to get tacked onto the base from both sides. the centre was removed so the dome was still open to soil. This entire step was probably overkill. I doubt I’d repeat it if I were to build another.
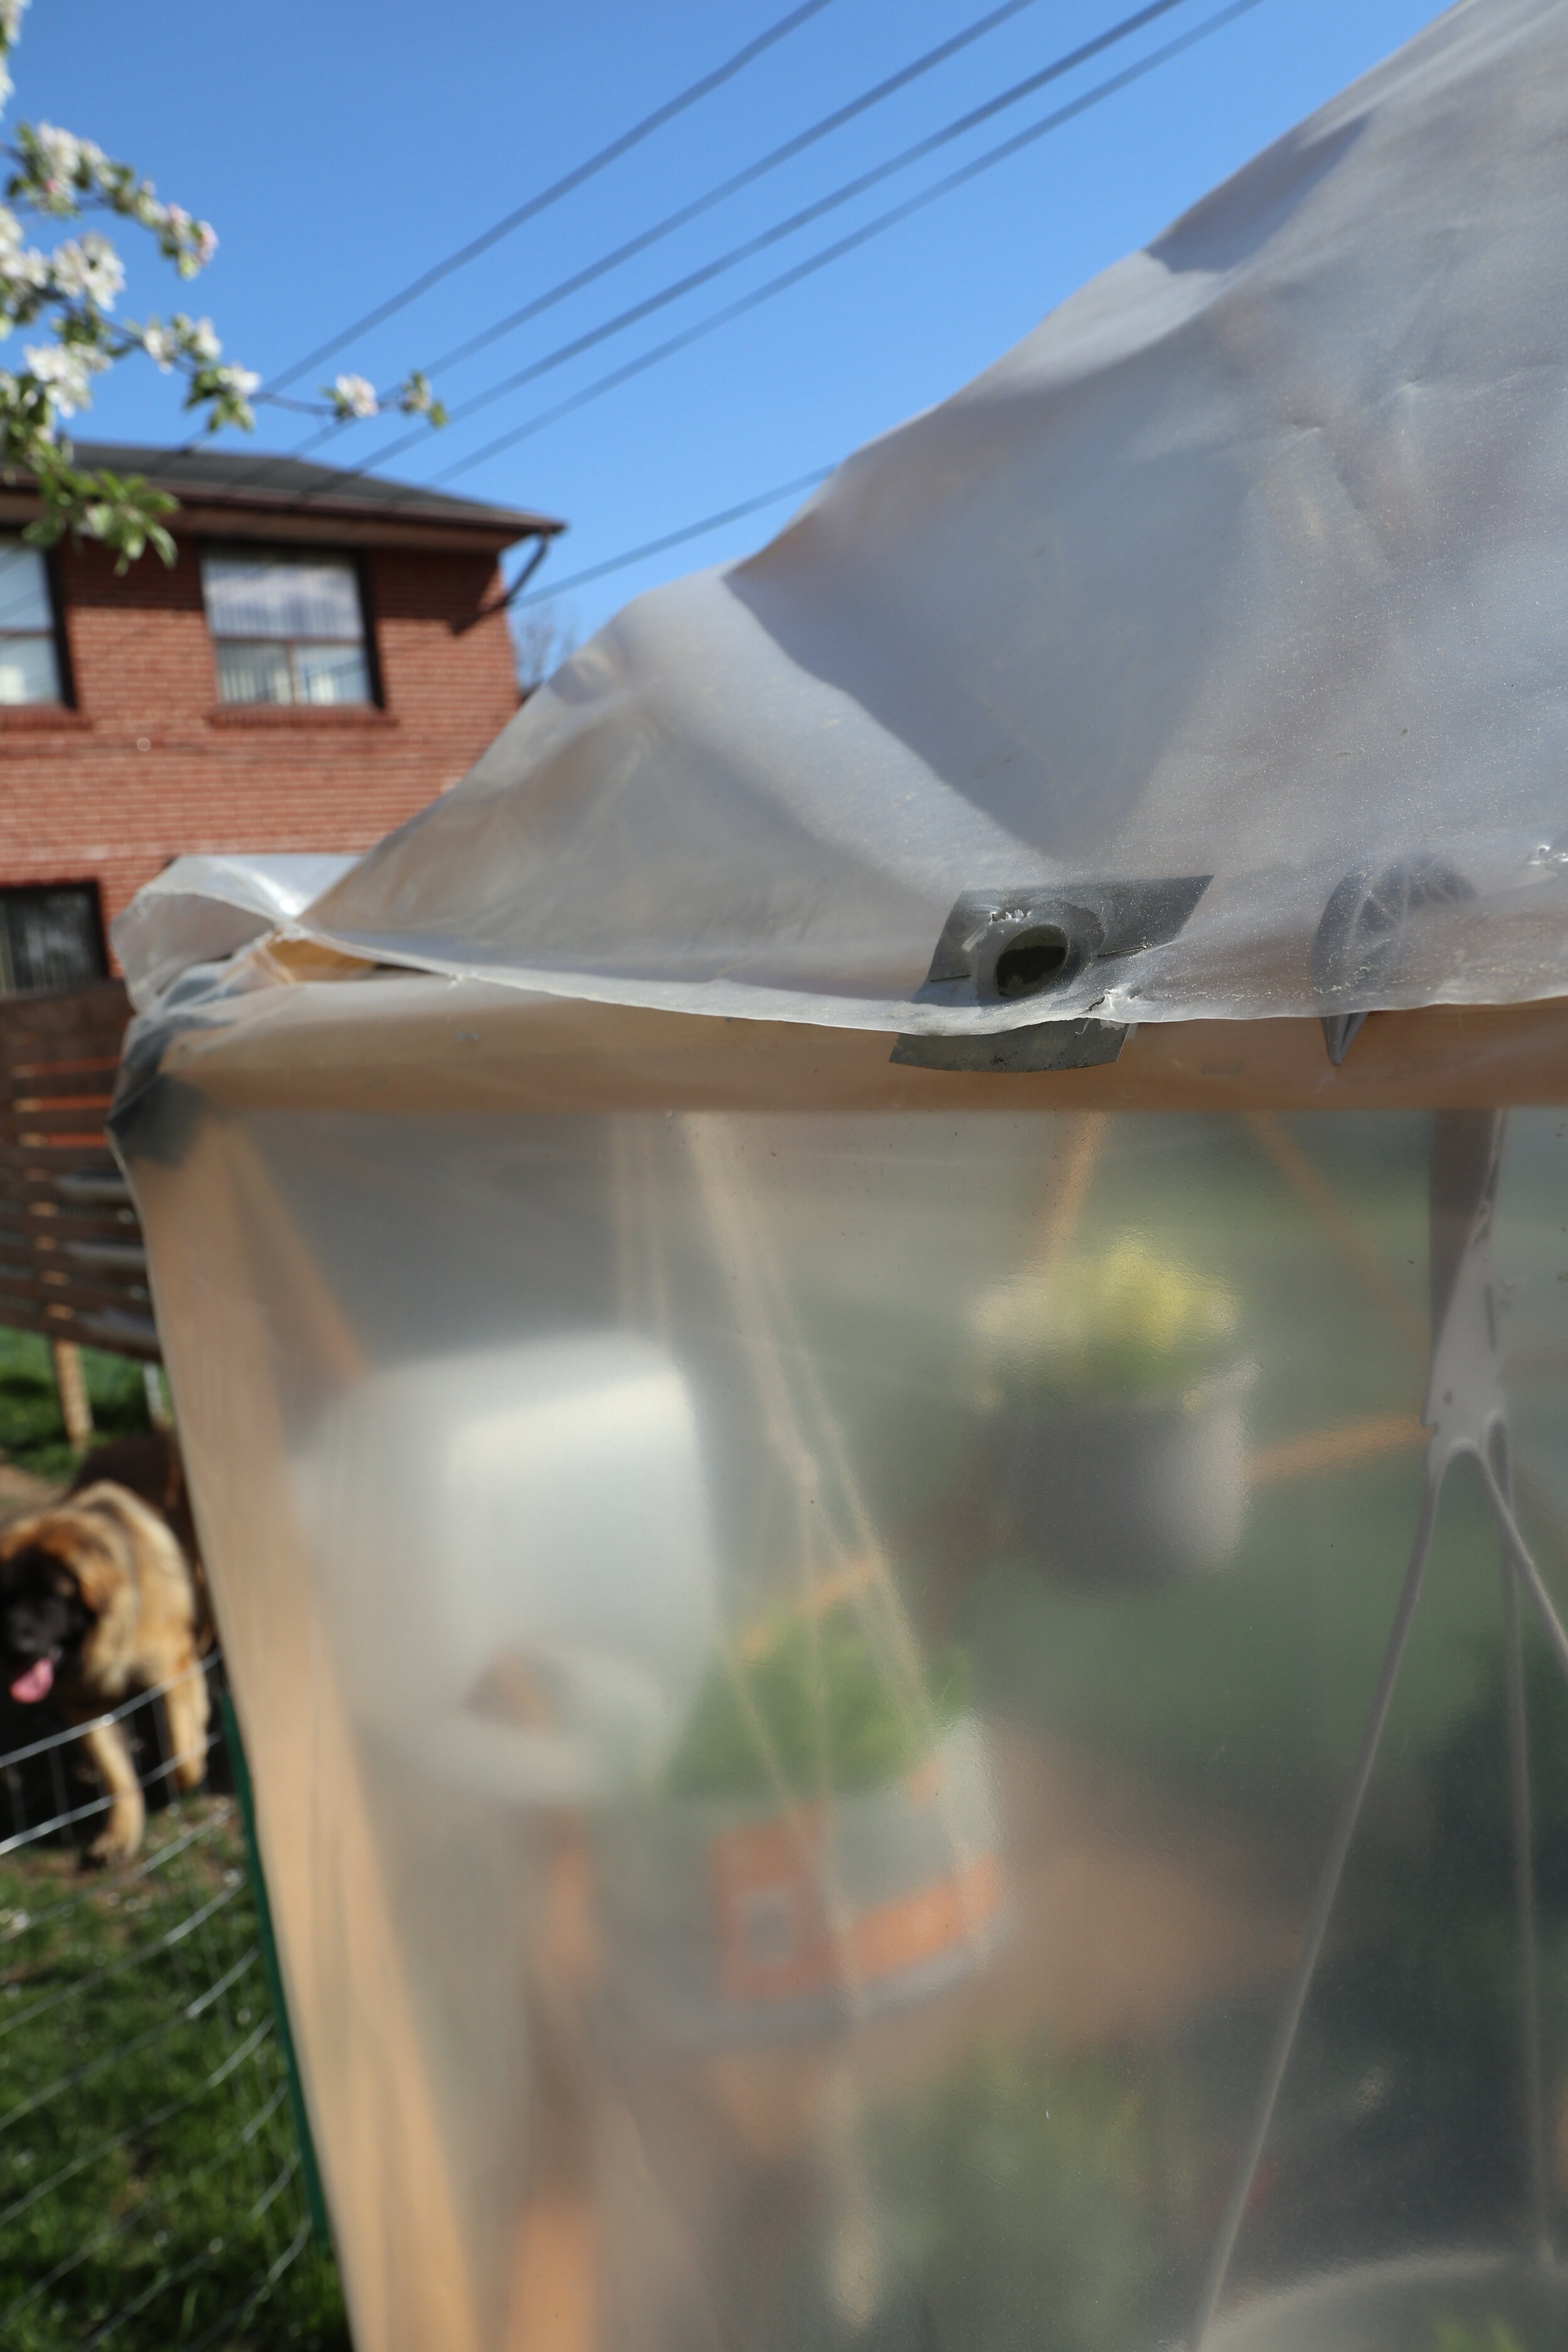
Roof: Wrapping the roof before wrapping the walls made maneuvering in and around the structure much easier. One large sheet, tacked along ridges, and trimmed to have a slight overhang over the walls. It was not secured along the perimeter.
Walls: Holding the roll vertically, one of us tacked it around where the roof met the walls, while the other walked, unrolling the poly. Then we trimmed it when we reached our starting point and began to staple it, pulling it taught, down the walls. We did not create any breaks for a door (make sure you don’t leave any tools or people inside the structure!). A doorway was sliced in once the walls were fully wrapped.
Anchoring the Geodome
After going to all this effort, the last thing you want is for the structure to take off in a windstorm and land elsewhere. It could cause injury or damage, and would spell disaster for whatever you have within. Anchoring this structure is not a step to skip. Even if it seems heavy to your muscles, mother nature is a beast at times.
Beside each vertical member of the knee wall we drilled a hole large enough to accommodate a 12” tent peg. The hole was a snug fit. Too loose and it has more chance of pulling out. The location for the peg, reflected where the forces would be transferring through the structure. We could probably have placed the anchor mid wall and not experience any issues.
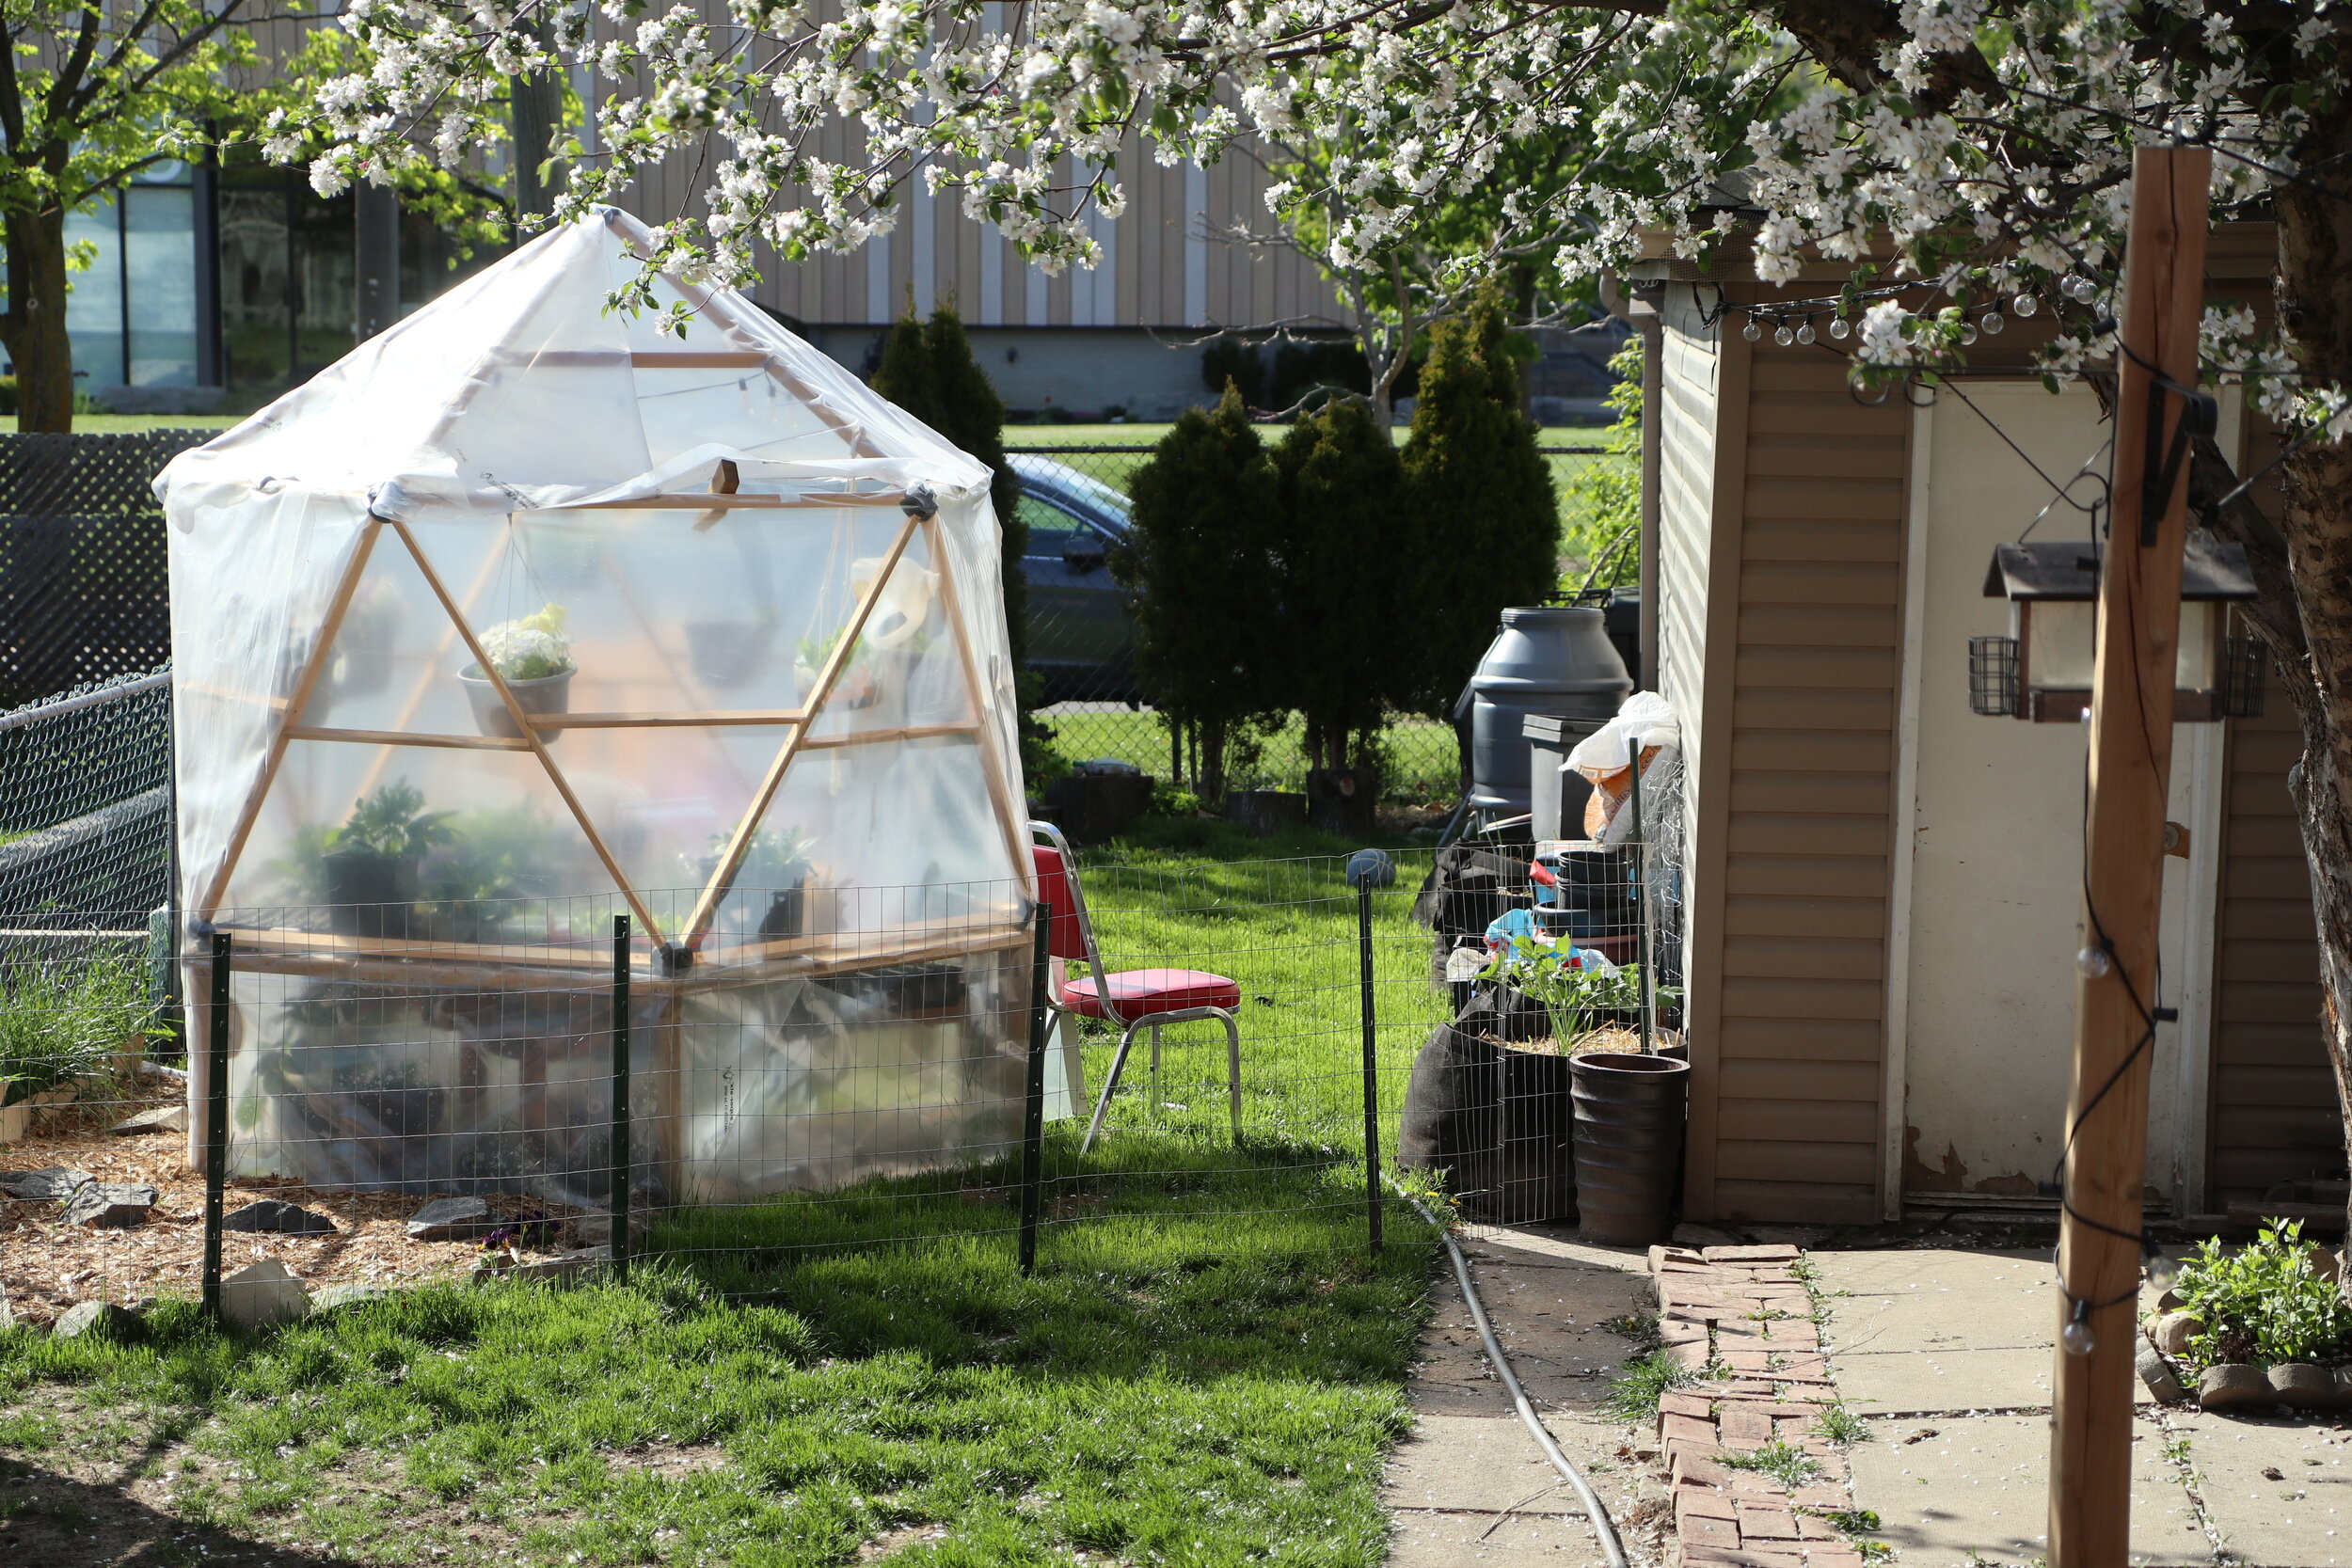
The Many Functions of a Geodome
When you commit a large percentage of your garden to a structure you want it to serve as many purposes as possible. Our single geodome serves many roles beyond a greenhouse as the season progresses. The Magidome creator has shared the incredible roles these structures serve in his home province of BC, including providing shelter for homeless individuals. Check out Magidome’s Instagram feed for the various ways these structures have been used.
The geodome has many functions in our garden such as:
Greenhouse
Vertical Growing Structure
Playhouse
Camping/Yurt
Storage
Transition from Geodome Greenhouse to Vertical Garden
The location of a greenhouse is often in prime growing area in order to harness the passive solar energy. This location makes it ideal for creating a vertical garden.
With the addition of garden netting over the exterior of the geodome, it gives vining plants such as scarlet runner beans, bottle gourds or cucumbers, a place to climb. If vegetable gardening is not your preference, a clematis could scale the sides of the structure.
By growing plants around the exterior of the structure, it shades the interior. This makes a much more comfortable location for growing leafy greens that wilt in the full sun, or a place for children to play, a place to relax, read, meditate etc.
The netting we chose was more ‘structural’, not flimsy. There are many very loose nettings that are on the market but some can tangle birds. We do many things to encourage birds in our garden so this was a key concern. My biggest concern was that my kid would stick her head through it or come up with some other fantastic and dangerous idea.

Our netting is a tighter weave and reduces the opportunity for danger with children around but still allows plants to hang on and climb. You can check out the one I bought from home depot here.
Converting a Greenhouse to a Playhouse
In the middle of summer, greenhouses can cook you and your plants alive without good ventilation and possibly the addition of shade cloth. In a structure of this size, that is a bit of engineering overkill. Instead of shade cloth, I chose to grow plants on the exterior to create natural shade. Keeping the poly on the dome, at least on the walls, helps to keep bugs on one side and my children on the other.
I have sheer cotton curtain panels, originally from IKEA, but sourced from a thrift store, that I may include within the structure for a more romantic, billowy tent feel and to help dilute the sun a bit more. We also picked up two matching mirrors from a curbside haul. An old small rug that I’ve had kicking around was added at the entry to give it a more house-like feel.
The floor, I covered in cedar mulch. In hindsight I should have added a layer of cardboard underneath to help suppress the grass in this area. I may still rake it out and relay the mulch over cardboard or leaf bags rather then continuing to weed. I did not want to wrap the floor in poly so that moisture can escape, especially when watering plants. The mulch provides a soft and lovely smelling space for my kids to play, and often becomes an ingredient in their nature soup.
The roof flaps are rolled back substantially on the non-plant-growing side to ensure adequate air flow.

How Much Time Does it Take to Build a Geodome Greenhouse?
Using the Magidome connector kit, it took us two hours to cut the wood and assemble the kit portion. It took us another two hours to create the custom knee wall and attach the dome to the base. It took a bit more then one hour to wrap the structure in poly and create the door closure. In total, with two people and power tools, it took us around 6 hours to build our custom geodome greenhouse.
What Tools Do You Need to Build a Geodome Greenhouse?
Saw (Miter Saw is ideal)
Drill
2 Drill bits
For anchor hole,
For predrilling wood
What Supplies Do You Need to Build a Geodome Greenhouse?
Magidome Connectors also available on Amazon
1x2x8 select pine x 18 pieces (for a 4’ magidome kit with cross bracing)
2x4x8 pressure treated pine x 10 pieces (for a knee wall to match the 4’ kit)
How much Does it Cost to Build a Geodome Greenhouse?
This is where Covid bites. Pre Covid lumber prices make this a very feasible project. In 2020 or 2021 with Covid inflating lumber prices in Canada, it was a bit unpleasant to buy lumber. It cost $437CDN (before tax) to build our geodome greenhouse in 2021.
If I base the lumber prices off 2019 (which I hope they will regulate back to something in that range), and keep all other materials at 2021 prices, the cost to build is $290! Drastic difference.
I was fortunate that Magidome found me while I was searching for greenhouse solutions and offered to send me their connectors to try in exchange for a review. That definitely helped ease the cost. Try them, and love them I did! Links back to their website in this article are affiliate, but this adds no additional cost to you. If you end up purchasing, I do get a small kick back for having introduced you to this nifty, Canadian product.
How can you get free Magidome Connectors? There will be a video joining this blog post to show how we built this dome and when it does, Magidome has agreed to give one connector kit away for free, shipping globally! Stay tuned for more details on that! For 10% off your Magidome Connector kit use code “BUYINGTHYME” at checkout.
How to Build a DIY Geodome Greenhouse
Pick your location.
A nice sunny space that ideally receives South to South-east sun, on a flat or level area. Avoid an area that gets soggy or floods in early spring as this is often the wettest and most used time for a greenhouse in Southern Ontario. With a geodome, the direction that you orient to does not matter the way it does with a rectangular or row style structure.
Pick your size
Depending on the lumber lengths you choose, your material needs will change. Everything in this how-to is based on 4’ lengths, or the ‘small’ option on Magidome’s website.
Source your materials
Avoid curbside pick ups for lumber. With large projects you’ll often factor in a margin for unusable lumber that gets delivered. Since we need so few pieces for this project I would recommend that you pick your lumber in person and inspect each piece. Look out for twisting, bowing or warped pieces and do not buy them.
When we went to get ours we picked over every single piece of select lumber and created three piles. Yes, maybe and no. There were not enough ‘perfect’ yes pieces available so a few ‘maybe’s’ had to be chosen. Leave it to an employee to collect your items and you’ll likely end up with a number of ‘no’ pieces in your lot.
Cut your select lumber to length. Don’t cut an 8 foot piece in half and assume it is two 4 foot lengths. Measure, mark and cut to 4 feet so that all your lengths are identical.
Place select lumber into Magidome connector and predrill a pilot hole using the connector as your guide.
Install screw through Magidome connector and into lumber.
Repeat until all connectors have been joined by lengths of lumber.
For the basic Magidome kit that is all there is to it. For the customizations to the 4’ kit that we made including knee wall and poly you’ll want to do the following:
Cut the 2x4’s to 52” length.
Set your miter saw to 36° and create angled cuts on each end of the 2x4’s. Make sure that each piece of lumber is left with a long side and a short side. You don’t want to end up with a parallelogram. (And you thought that high school math would never be useful!) Repeat until you have 10 pieces that make two pentagons.
Cut 7 pieces of lumber to equal lengths to serve as your vertical members of the knee wall. Two of these will frame the door opening. How long should they be? How tall do you want the knee wall or the overall structure? Ours were cut to 21”.
Using 2.5” or 3” deck screws assemble your two pentagon shaped pieces. Your comfort level with a drill will determine where you drill and if you ‘hide’ the screws in the wide face of the lumber or drill in from the exterior edges.
Attach the vertical pieces at each point of the pentagon. Pick a side for the door, and a width for the door. (I’d recommend 24-30” clear opening) and install the last two vertical members to frame the door opening.
Place the second pentagon on the vertical members and screw into place. Best to grab a second set of hands for this step.
Place the knee wall frame in it’s final location.
Place the Magidome assembled kit on the knee wall. Ensure the face where the door will be has a triangle with it’s long edge at the bottom.
Using at least 3” screws, drill through the base lumber of the Magidome and into the top of the knee wall frame. We placed a screw on each side of a Magidome connector, or 2 screws per 4’ length of lumber.
At this point we cut out the 2x4 that was blocking the door. We used an oscillating tool but a skillsaw, jigsaw, hacksaw, hand saw, any number of saws can make this cut.
Add cross-bracing members to your Magidome walls. There are a variety of styles that people have opted to do. I’d recommend checking out Magidome’s Instagram for inspiration. This is where you can have fun with the customization and make it your own.
We added 3 additional cross-bracing members along the interior of the kneewall. These serve as plant shelves and seating. What angle do you cut to? We held the scrap wood in place and drew a line where the cross bracing intersected the pentagon frame and cut accordingly.
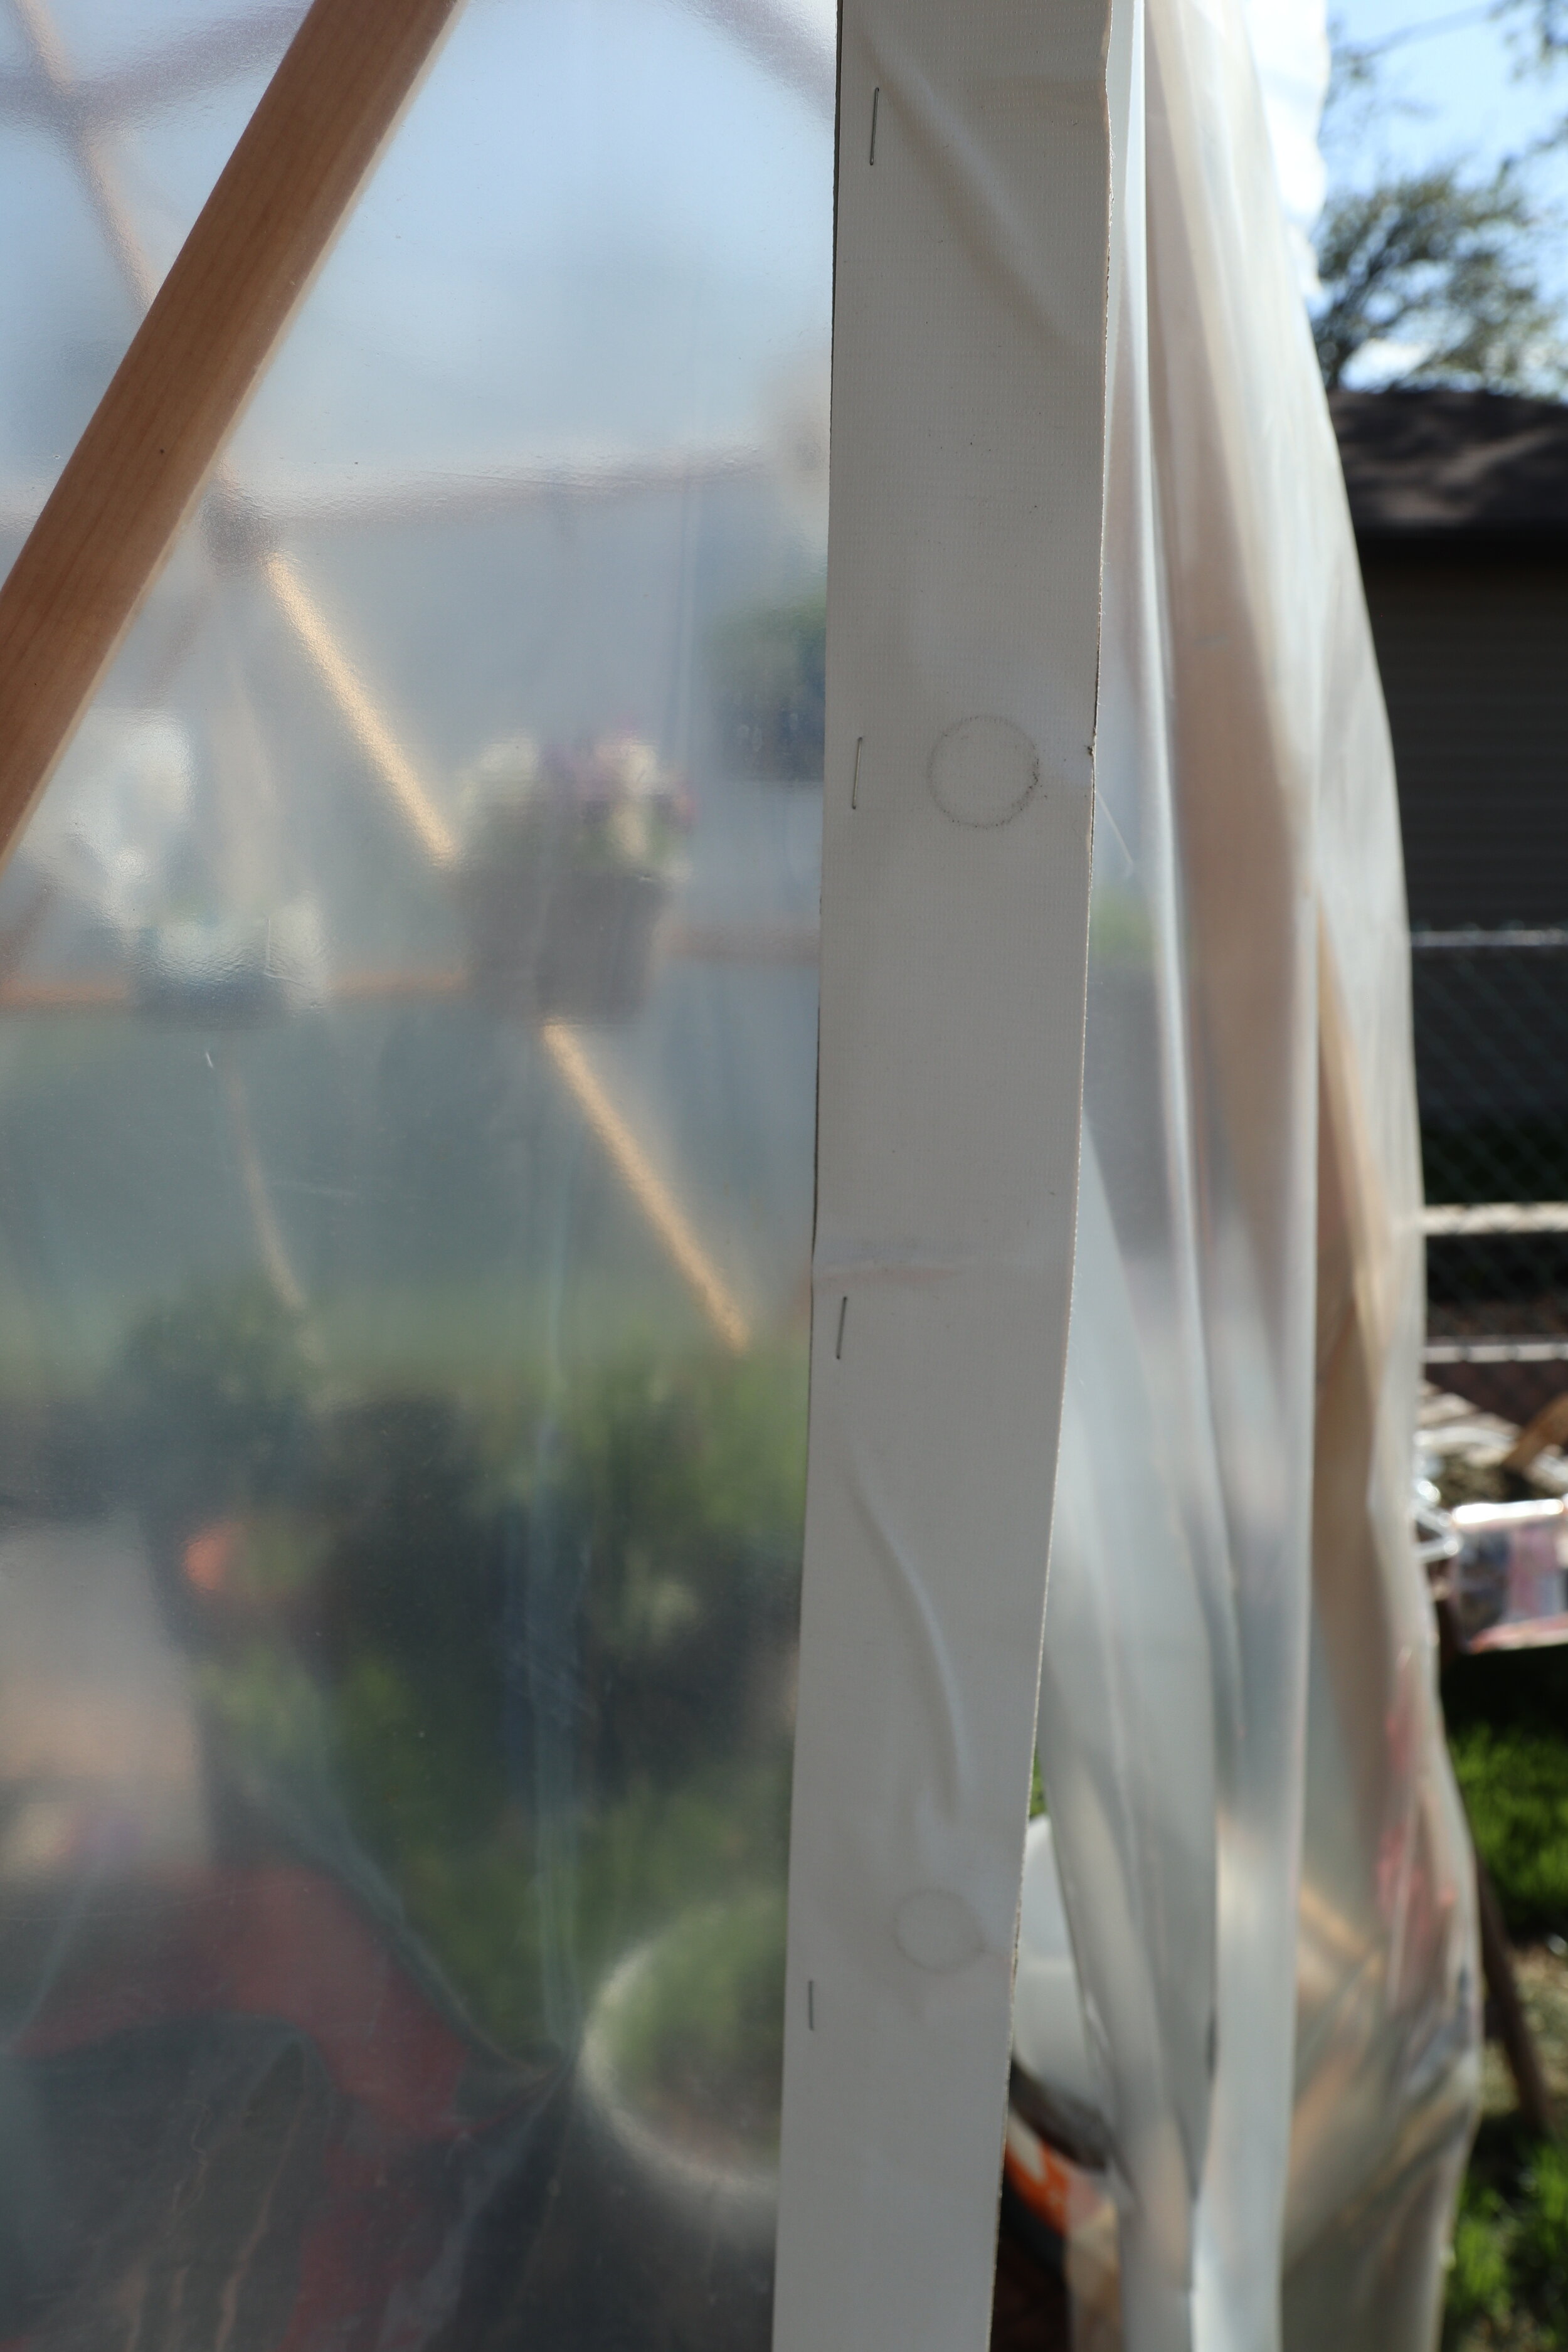
Cover the roof in a continuous sheet of poly, leaving approximately 2-3” of overhang around each edge. Staple in place along vertical ridges, leaving perimeter unattached.
Wrap poly around the walls. We found it easiest to have one person walking and slowly unraveling the role of poly while the other stapled along the top edge (where wall meets roof). Once the top was secured all the way around (making sure no tools or people are trapped within), we attached it along the remainder of the wood until we reached the ground. Cut off the excess where it meets the ground. The poly was wrapped up and over the roof line, wrapping the top perimeter of wood (it lays under the roof poly).
Slice an upside down “T” into the poly at your door.
Apply a length of gorilla tape to the door slice, sticking half of the tape onto the poly, leaving the other half extending beyond the poly. Add a magnet every 12”-18” along the length of the exposed gorilla tape. Apply a second piece of gorilla tape, sticky side to sticky side sandwiching the poly and magnets. Repeat on the opposite side of the door opening. Make sure that the direction the magnets faces work to attract each other and not repel.
Drill a hole in the knee wall base, beside each vertical member for the anchoring tent peg. Hammer tent peg through the hole, anchoring the dome in place.
Having this additional space to sow seeds, grow starts and help harden plants off gave us so many possibilities for our garden that we’d otherwise not have. I was able to create the cutting garden I had wanted to make for our kids. I started enough vegetable seedlings for both our own veggie garden but also our family’s garden and then gave away loads to my community. When you build yours, I’d love to see what you do with the structure. Tag me @buying_thyme!

It is my goal with Buying Thyme to connect the community to nature and practice sustainability practices so we can better our patch of the ecosystem. Our flowers invite you to slow down, savor simple joys, and celebrate the beauty of the seasons wherever you take them, but our blog teaches you how you can apply everything we have learned, on your own property! For our Southern Ontario specific gardening tips make sure to peruse our other blog articles here.
Buying Thyme is your local source for seasonal, sustainably grown flowers. Visit our flower stand where we offer locally gown, cut flowers, to Durham Region. All grown right here on our North Oshawa/Hampton micro flower farm.
Unlike most florists offerings, these flowers have a negative carbon footprint with no transportation, sprays or pesticides. Each year our collection of Ontario native plants grows, which not only offers more beautiful flowers to our clients but also contributes to restoring the local ecosystem.
To learn more about our floristry services and products or to visit the flower stand click here.